Support and Learn
This page covers virtually all support issues for the latest version of ActiveWords and access to free email support.
Please take some time and first look in our FAQs below.
If you can't find what you are looking for you can create a new ticket or view my open tickets
For help with ActiveWords 4 click here.
Search All Topics
Most Viewed
The ActionPad is a quick-launch input field that appears on demand. It provides a single place to enter and trigger your Words, act on text using Selected Text actions, search your computer, perform calculations, and more.
Opening the ActionPad
Press Ctrl+Space (the default hotkey) to open the ActionPad. You can change this hotkey in Options → ActionPad tab. In ActiveWords 5, the ActionPad hotkey is configured in one place only—the ActionPad tab—to avoid confusion.
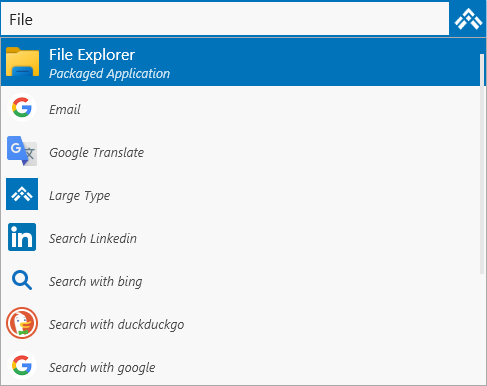
What the ActionPad Can Do
The ActionPad has been significantly extended in Version 5. When you type, it searches according to your settings in Options. By default, it can find:
- ActiveWords – Your Words and their associated actions
- Folders – Files and folders on your computer
- Applications – Installed programs (including packaged apps from the Microsoft Store)
- Start Menu items – Programs and shortcuts from the Windows Start menu
- Selected Text actions – Type or paste text, press Enter, and choose an action (e.g., Google Translate, Bing search) to run with that text
- Advanced Calculator – Enable for math calculations in the ActionPad
- Date Calculations – Enable for date arithmetic (e.g.,
today+1month) - Math Calculations – Enable for math in the ActionPad (e.g., 2+2)
- Window Search – When enabled, search your computer for folders, applications, and Start Menu items
- Calendar Functions – Enable for date expressions (e.g., today, next Friday)
Select any result and press Enter (or click) to trigger it. The action runs in the context where you were working.
Note: If typed text does not match any action, only Selected Text actions are shown.
Configuring the ActionPad
Open the ActionPad Options tab to customize what appears and how it behaves.
Using the ActionPad with Selected Text
The ActionPad works seamlessly with Selected Text. Type or paste text into the ActionPad and choose a Selected Text action (such as Google Translate or Bing search) from the results. The action executes instantly with your text.
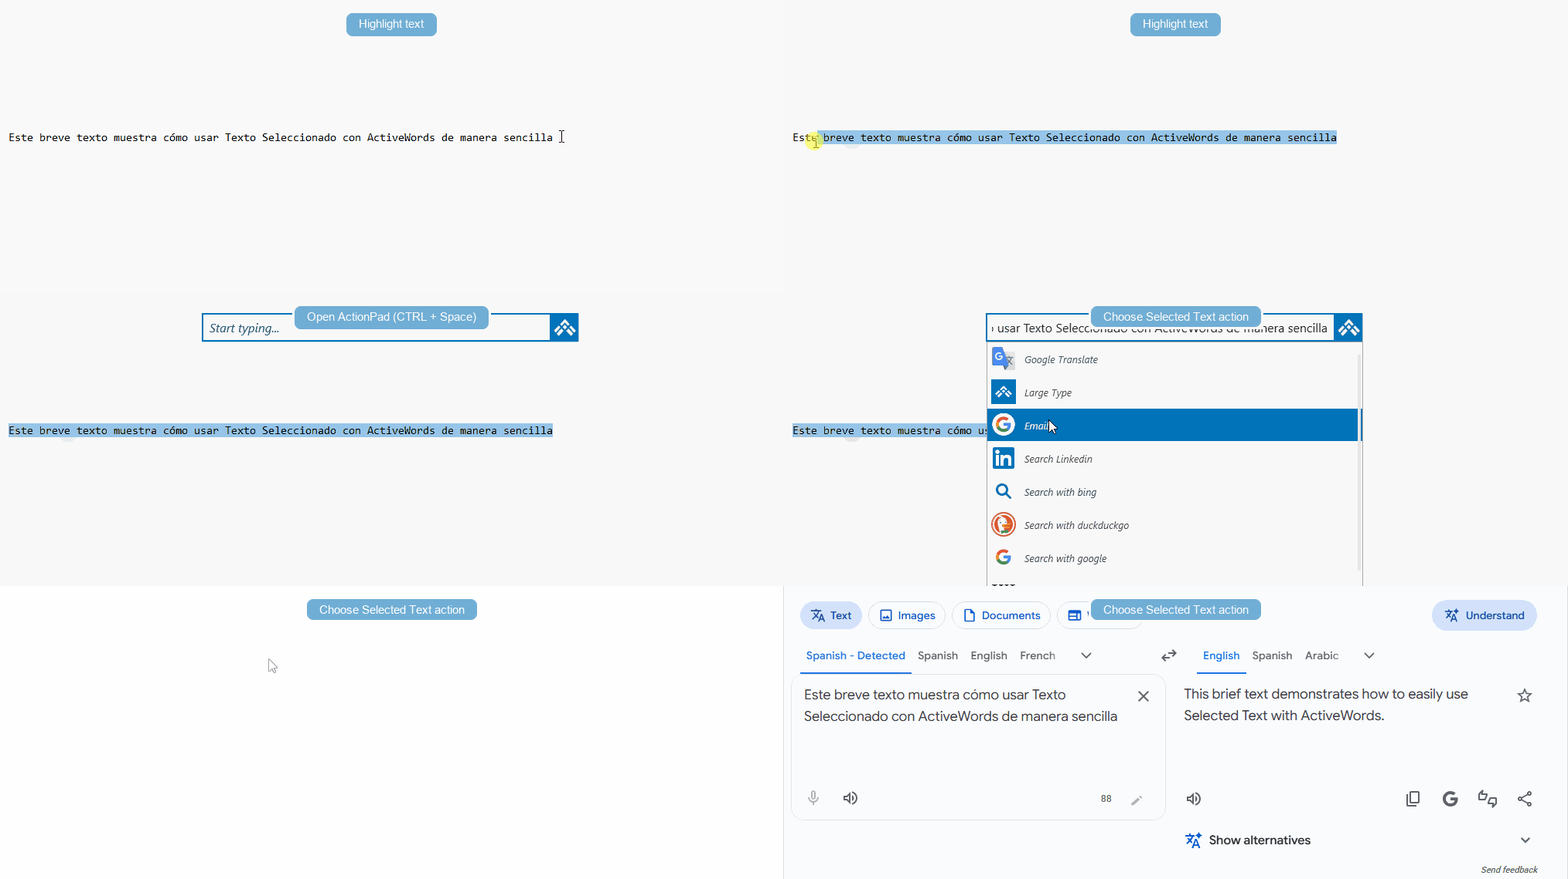
Using the ActionPad to Trigger Words
You can also use the ActionPad when you don't want to type a Word in your current context (e.g., in a web form or email). Open the ActionPad, type your Word, press Enter, and the associated action runs. Words triggered from the ActionPad do not include a trailing delimiter in text substitutions.
Related FAQs
- Selected Text – Act on highlighted or pasted text
- Hotkeys – Customize the ActionPad hotkey and other shortcuts
ActiveWords Sync keeps your Words, Actions, and Tags available across your Windows devices by storing your ActiveWords data in a cloud-synced folder.
Note: You must have an account and the cloud service software installed on each computer where you want your Words and Actions to sync. Download links are listed below.
See video: Watch the video
Set Up Sync on Each ActiveWords Installation
- Install and sign in to your cloud service on each Windows device you want to sync.
- Right-click the ActiveWords floating icon or system tray icon and open Options.
- Select the Sync tab.
- Choose the cloud service you want to use.
- If your cloud service is not listed, or if you use a custom cloud folder location, choose Other and browse to the top-level local folder for that service.
- Click Apply.
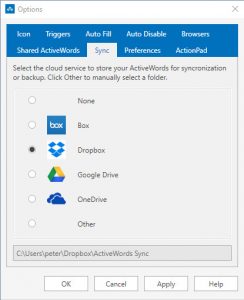
When you click Apply, ActiveWords creates a folder named ActiveWords Sync inside the cloud service folder you selected.
Note: Do not rename or modify the contents of the ActiveWords Sync folder. Setting Sync to None removes the sync data file for that ActiveWords installation.
Supported Cloud Services
Sync should work with any cloud service that creates a local sync folder available through Windows Explorer. ActiveWords Sync is commonly used with services such as Dropbox, OneDrive, Box, and Google Drive.
OneDrive users may need to make the ActiveWords Sync folder available locally, depending on how OneDrive is configured.
How Sync Updates Your Data
Your ActiveWords data in the cloud updates automatically as you make changes. Changes are noted when you import, add, edit, or delete Words, Actions, and Tags.
When you move to another internet-connected device, the availability of recent changes depends on two things:
- How much time the previous device had to update the cloud folder.
- How quickly the cloud service updates the local folder on the next device.
Sync Requirements
- The cloud service must be installed and running on each device before enabling ActiveWords Sync.
- Each device must use the same cloud service account.
- The local top-level cloud folder may be in a different location on each device.
- ActiveWords Sync requires a functioning internet connection.
- The ActiveWords Sync folder must be available locally, not cloud-only.
Additional Notes
- Enabling ActiveWords Sync keeps the latest version of your ActiveWords database backed up in the cloud, even if you only use one device.
- OneDrive and some other cloud services may require you to manually mark specific folders as available offline. The ActiveWords Sync folder must maintain its content locally.
- Sync requires each database to contain a unique Windows
machine_guid. This identifies a specific Windows installation. - Sync may not work correctly if more than one computer has the same
machine_guid. This can happen when Windows installations are cloned.
Cloud Service Download Links
Related FAQs
The Advanced Calculator lets you perform math calculations directly in the ActionPad. Type a numeric expression and press Enter—the result is substituted immediately. This is useful for quick calculations without leaving your workflow. It supports basic arithmetic plus many advanced functions, constants, and operators; the full scope is too large to document here.
Enabling the Advanced Calculator
Open Options and go to the ActionPad tab. Turn on Advanced Calculator to use math expressions in the ActionPad. When enabled, expressions such as 25*4 or 100/3 are evaluated and the result is inserted.
Using the Advanced Calculator
Open the ActionPad (default: Ctrl+Space), type a math expression, and press Enter. The result is delivered in the context where you were working—for example, into a document, email, or Notepad. Expressions that start with a number (e.g. 1+2, 25*4) are evaluated automatically. If your expression starts with a function or constant (e.g. sqrt, sin, pi), type = first so the calculator recognizes it. For example, =sqrt(16) or =sin(pi/2). Examples:
1+2→ 31+2/3+(4*5-10)→ mixed arithmetic2*pior=sqrt(16)→ constants and functions=sin(pi/2)→ 1=sum(n, 1, 100, 1/n^2)→ summation (e.g. sum of 1/n² from n=1 to 100)=int(sqrt(1-x^2), x, -1, 1)→ definite integral (π/2)
Note: When you press Enter, the calculated result is inserted directly into the application where your cursor is currently located (for example, in Notepad, a document, or an email).
See it in action

Related FAQs
- ActionPad – Overview and configuration
- Date Calculations – Date arithmetic in the ActionPad
- Windows Search – Search files, folders, and applications
Date Calculations let you perform date arithmetic directly in the ActionPad and in your actions. Type expressions like today+1m and the result is substituted immediately—no need to look up the date yourself.
Enabling Date Calculations
Open Options and go to the ActionPad tab. Turn on Date Calculations to use date expressions in the ActionPad. On the same tab, set the date format for results: Short date or Long date. Short date is typically numeric (e.g. 3/3/2025); long date includes the day and month name (e.g. Monday, March 3, 2025). The format you choose here applies when you insert a date from the ActionPad or from an action.
Using Date Calculations in the ActionPad
Type a date expression in the ActionPad and press Enter. Use the single-letter units d, w, m, and y (not "day", "week", "month", or "year"). For example:
today+1m– One month from todaytoday+1w– One week from todaytoday-1d– Yesterdaytoday+1y– One year from today
Note: Do not put spaces in date expressions. Use today+1m, not today + 1 m.
See it in action
Set the date format (Short date or Long date) in Options → ActionPad.
Then open the ActionPad, type a date expression (e.g. today or today+1w), and press Enter. The result is inserted where your cursor is.
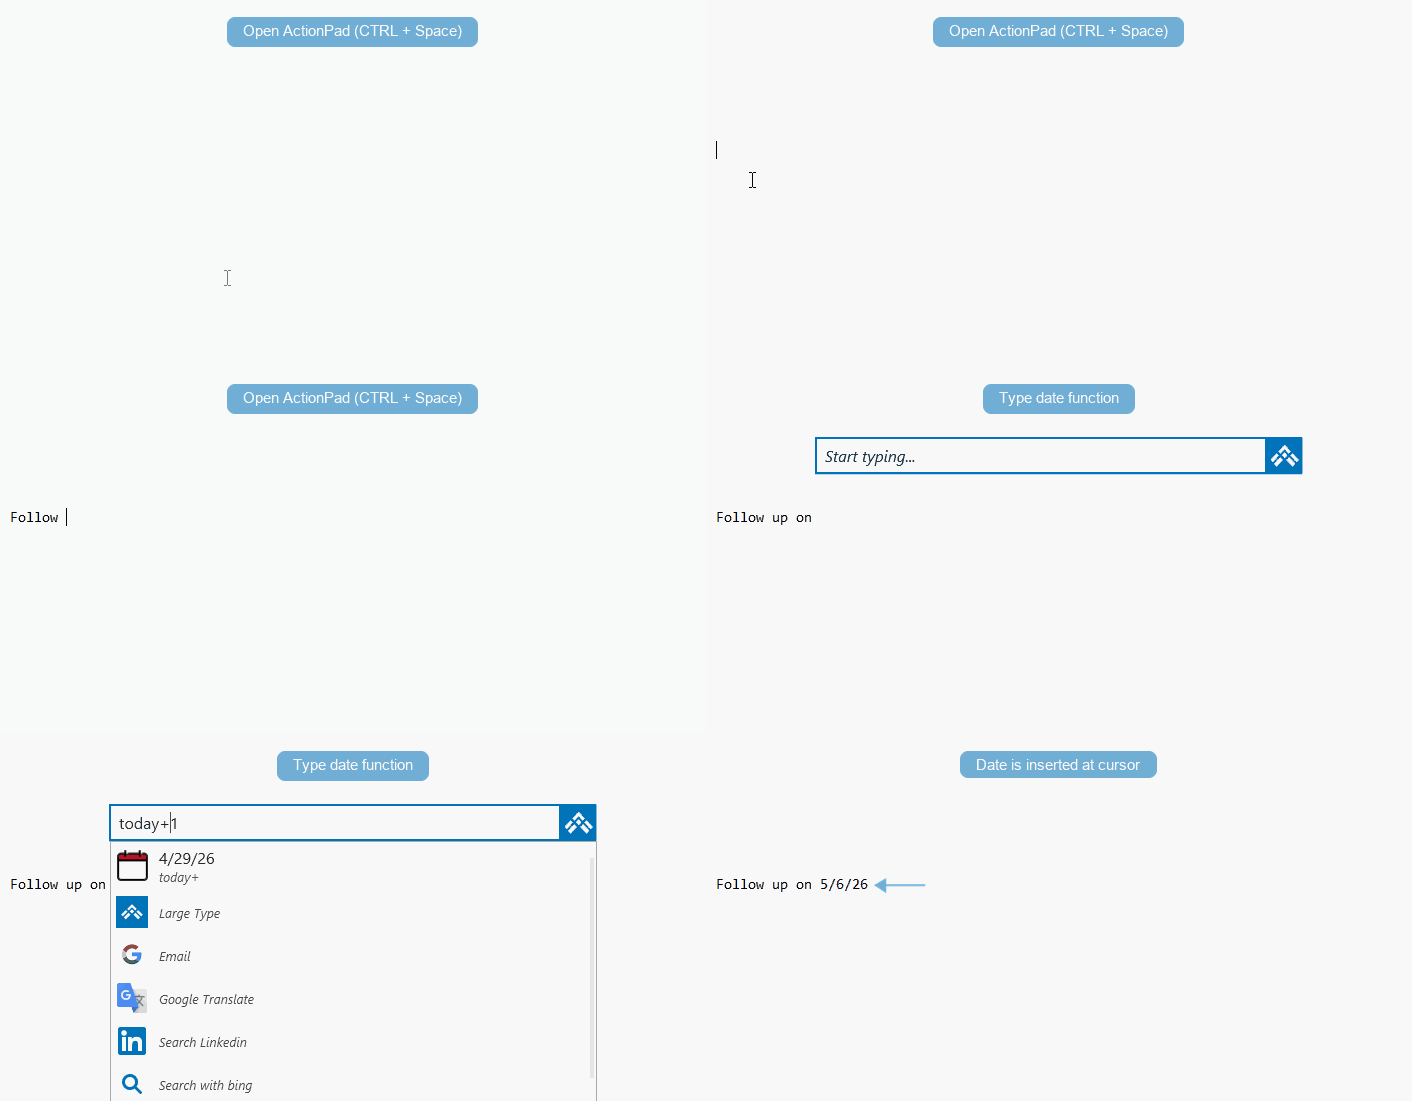
Using Date Calculations in Actions
Date calculations work in Substitute Text and Substitute Content actions too. You can embed date expressions within larger text—for example, a letter header that includes "long date minus one day" so the date updates automatically. This is useful for templates, reports, and any action where the date should reflect today or a relative date.
Related FAQs
- ActionPad – Overview and configuration
- Advanced Calculator – Math expressions in the ActionPad
- Windows Search – Search files, folders, and applications
Shared ActiveWords let a central administrator distribute and control a common set of Words and Actions for users on a Windows network. This is useful when a group needs consistent language, approved text, shared commands, or centrally managed Actions.
How Shared ActiveWords Work
When an ActiveWords file (*.awdb) is assigned as Shared, its data is inserted into each user's ActiveWords data file for normal use. Users can trigger Shared ActiveWords from the main ActiveWords interface, but they cannot edit or delete the shared records from their local user interface.
ActiveWords periodically checks whether the assigned Shared ActiveWords file has been updated. When an update is detected, the previous shared data is removed from the user's data file and the updated shared data is inserted.
Shared ActiveWords files can be stored at any network location accessible by each ActiveWords user.
Creating an ActiveWords File to Share
An administrator creates an ActiveWords file containing the Words and Actions to be shared, then exports that file from the ActiveWords client.
- Create the Words and Actions to be shared.
- Give each Action a useful Description that identifies the shared relationship.
- Assign the same Tag to the Actions you want to export together.
- Right-click the Tag and select Export.
- Name and save the resulting
*.awdbfile at the desired network location.
The network folder and *.awdb file must have read/write access for the ActiveWords users on the network and must be simultaneously accessible by the number of users running ActiveWords.
Create Shared ActiveWords video: Watch the video.
Assigning a Shared ActiveWords File
After the shared file is saved on the network, assign its location to each client. You can do this manually in the Shared ActiveWords settings, by sending users a URL link, or by running a command line file containing the path to the shared file.
Assigning with URL Links or Command Files
Use these URL formats to add or remove Shared ActiveWords assignments:
- Add:
activewords:shared?file=[path to file] - Remove:
activewords:shared?remove=[path to file]
Note: The network path to a Shared ActiveWords file must use a mapped drive, such as Z:\Folder\File, not a UNC path such as \\SERVER\Folder\File.
For command files, use the ActiveWords executable followed by the shared file URL. For example:
C:\Program Files (x86)\ActiveWords 5\ActiveWords.exe "activewords:shared?silent=yes&file=Z:\Folder\File.awdb"
The silent=yes&file= syntax can be used in links and command files to suppress the confirmation dialog. Administrators can run *.cmd files for multiple ActiveWords installations using network management tools. Create command files in a plain text editor such as Notepad and save them with the .cmd suffix.
Assigning in the Settings Dialog
- Right-click the floating icon or system tray icon and select Options.
- Open the Shared ActiveWords tab.
- Click Add, then navigate to and open the ActiveWords file to be shared.
- Click Apply, then exit Options.
The contents of the Shared ActiveWords file are inserted into the user's ActiveWords data file and become available immediately.
Assign Shared ActiveWords video: Watch the video.
Editing a Shared ActiveWords File
For easier editing, assign the same Tag to all Actions used in a Shared ActiveWords file. Exporting that Tag creates a *.awdb file containing the Tag and its related Words and Actions.
Editing Shared ActiveWords files requires Advanced Options. Turn on Advanced Options by checking Show advanced tools and options in the Preferences tab of the Options dialog.
- Right-click the floating icon and select Advanced → Exit external database.
- Use the file browser to locate and select the active Shared ActiveWords file on the network.
- The selected Shared ActiveWords file loads as the active database, and the administrator's personal data file is closed.
- Click Activate on the ActiveWords License dialog and select a valid license file.
- Edit the shared Words and Actions as needed.
- Right-click the floating icon and select Exit when finished editing.
- When prompted, save your changes and deactivate the license applied to the Shared ActiveWords file.
When you exit, the existing Shared ActiveWords file is overwritten at its network location. ActiveWords clients assigned to that file automatically receive the updated shared data. The administrator's personal ActiveWords data file is loaded again when ActiveWords starts on the administrator's machine.
Edit Shared ActiveWords video: Watch the video.
Other Attributes of Shared ActiveWords
- Shared ActiveWords assignments are automatically removed from local ActiveWords installations if the file or path no longer exists.
- If the network path is temporarily unavailable, Shared ActiveWords remain in the user's data file so the user can continue working.
- If a Shared ActiveWords file contains an Action identical to one in the user's personal ActiveWords file, it is included as a duplicate Action.
- Multiple Shared ActiveWords files can be assigned.
- Shared ActiveWords files must have read/write security permissions and be accessible by the users assigned to them.
- Shared ActiveWords in the user data file are ignored by ActiveWords Sync.
After a year of extensive testing and development alongside the ActiveWords community, we're proud to introduce ActiveWords 5. It is a free upgrade for every existing user and the biggest step forward for ActiveWords in years.
ActiveWords 5 keeps the familiar idea at the heart of ActiveWords: type a Word, trigger an Action, and keep moving. Version 5 extends that idea with a more capable ActionPad, better ways to work with selected text, improved hotkeys, new calculation tools, and a stronger foundation for building and organizing Actions.
A More Capable ActionPad
The expanded ActionPad is one of the biggest changes in ActiveWords 5. It is now a central, keyboard-driven place to search, calculate, discover, and act.
- Trigger your Words and Actions
- Find applications, files, folders, and Start Menu items
- Perform advanced calculations and date calculations
- Work with Selected Text actions
Learn more in the ActionPad FAQ.
Selected Text Becomes Central
Selected Text, previously called ActionText, is now easier to understand and more central to the ActiveWords workflow. Highlight text almost anywhere on your computer, then use ActiveWords to search, look something up, send the text into a custom Action, or display it in Large Type.
Selected Text actions can also appear in the ActionPad, bringing search, selection, and action together in one place.
Improved Hotkey Management
Hotkeys in ActiveWords 5 are more flexible and less confusing.
- The ActionPad hotkey is configured in one place
- Individual Actions can have their own hotkeys
- Multiple Actions can share a hotkey and present a Pick List
New Tools for Everyday Work
ActiveWords 5 adds several practical capabilities that help in the middle of real work:
- Advanced Calculator for more complex numeric expressions
- Date Calculations in the ActionPad and in Actions
- Large Type for displaying selected text clearly
- Optional audio feedback when text expansion completes
Easier Organization and More Powerful Actions
Tags now have a new interface in the main window, making larger collections of Actions easier to manage.
The Wizard helps you build more advanced Actions with less guesswork. It can insert syntax for scripting and prompted input, giving both new and experienced users a clearer path into deeper automation.
Important Structural Changes
ActiveWords 5 also includes changes to how data is stored and managed:
- The folder structure has been simplified
- The internal database format has changed
- Actions created or modified in ActiveWords 5 are not compatible with ActiveWords 4
These changes support future development, but they are important to understand before switching versions.
What to Read Next
All Topics
The Options → ActionPad tab is where you configure everything about the ActionPad: what appears when you search, how search works, and how the ActionPad looks. This FAQ describes each option on the tab.
Where to Find It
Right-click the ActiveWords icon (system tray or floating icon) and choose Options. Open the ActionPad tab. In ActiveWords 5, the ActionPad hotkey is configured only here, so all ActionPad settings are in one place.
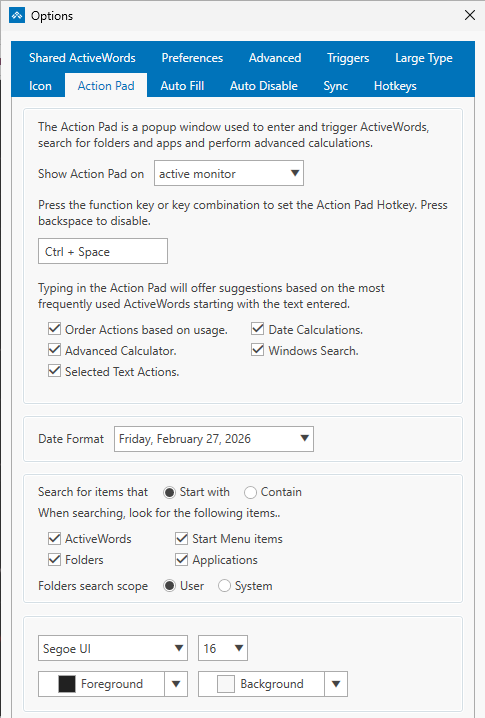
ActionPad Hotkey
Set the key combination that opens the ActionPad (default: Ctrl+Space). This is the only place in Options where you can change the ActionPad hotkey.
What Shows in the ActionPad
Use the toggles on this tab to choose what the ActionPad searches when you type. You can turn each category on or off:
- ActiveWords – Your Words and their associated actions
- Folders – Files and folders on your computer (requires Window Search to be enabled)
- Applications – Installed programs, including packaged apps from the Microsoft Store (requires Window Search to be enabled)
- Start Menu items – Programs and shortcuts in the Windows Start Menu (requires Window Search to be enabled)
- Selected Text actions – Type or paste text, press Enter, and choose an action (e.g., Google Translate, Bing search) to run with that text. See Selected Text.
- Advanced Calculator – Math expressions in the ActionPad (e.g.,
25*4). See Advanced Calculator. - Date Calculations – Date arithmetic in the ActionPad (e.g.,
today+1month). See Date Calculations. - Windows Search – When enabled, the ActionPad can search your computer for folders, applications, and Start Menu items. See Windows Search.
Windows Search Options
When Windows Search is enabled, two additional settings control how search works:
- How search matches – Starts with (results must begin with what you type) or Contains (results can match anywhere in the name)
- Where to search – System (entire computer) or User (only files and folders under your user profile)
See Windows Search for details.
Appearance
The ActionPad tab also includes appearance settings: font size, color, and other display options.
Related FAQs
- ActionPad – Overview and how to use the ActionPad
- Selected Text – Act on highlighted or pasted text
- Advanced Calculator – Math in the ActionPad
- Date Calculations – Date arithmetic in the ActionPad
- Windows Search – Search folders, applications, and Start Menu
- Hotkeys – Other hotkeys (ActionPad hotkey is set on this tab only)
The ActionPad is a quick-launch input field that appears on demand. It provides a single place to enter and trigger your Words, act on text using Selected Text actions, search your computer, perform calculations, and more.
Opening the ActionPad
Press Ctrl+Space (the default hotkey) to open the ActionPad. You can change this hotkey in Options → ActionPad tab. In ActiveWords 5, the ActionPad hotkey is configured in one place only—the ActionPad tab—to avoid confusion.
What the ActionPad Can Do
The ActionPad has been significantly extended in Version 5. When you type, it searches according to your settings in Options. By default, it can find:
- ActiveWords – Your Words and their associated actions
- Folders – Files and folders on your computer
- Applications – Installed programs (including packaged apps from the Microsoft Store)
- Start Menu items – Programs and shortcuts from the Windows Start menu
- Selected Text actions – Type or paste text, press Enter, and choose an action (e.g., Google Translate, Bing search) to run with that text
- Advanced Calculator – Enable for math calculations in the ActionPad
- Date Calculations – Enable for date arithmetic (e.g.,
today+1month) - Math Calculations – Enable for math in the ActionPad (e.g., 2+2)
- Window Search – When enabled, search your computer for folders, applications, and Start Menu items
- Calendar Functions – Enable for date expressions (e.g., today, next Friday)
Select any result and press Enter (or click) to trigger it. The action runs in the context where you were working.
Note: If typed text does not match any action, only Selected Text actions are shown.
Configuring the ActionPad
Open the ActionPad Options tab to customize what appears and how it behaves.
Using the ActionPad with Selected Text
The ActionPad works seamlessly with Selected Text. Type or paste text into the ActionPad and choose a Selected Text action (such as Google Translate or Bing search) from the results. The action executes instantly with your text.
Using the ActionPad to Trigger Words
You can also use the ActionPad when you don't want to type a Word in your current context (e.g., in a web form or email). Open the ActionPad, type your Word, press Enter, and the associated action runs. Words triggered from the ActionPad do not include a trailing delimiter in text substitutions.
Related FAQs
- Selected Text – Act on highlighted or pasted text
- Hotkeys – Customize the ActionPad hotkey and other shortcuts
This configuration is preferred as all ActiveWords Actions can be triggered from the local keyboard and carried out in the remote session; including substitutions, opening URLs, files, folders and programs, as well as executing scripts.
ActiveWords Installed on the Local Machine Only.
ActiveWords text and content substitutions delivered from the local computer to a remote session window are supported subject to clipboard security settings (see your network administrator and Citrix references below). The local executable supporting your remote session should not be in the "Auto Disable" list in ActiveWords Options. All non-substitution Actions triggered locally will be executed locally (Open URL, etc.). Note that Microsoft Remote Desktop Connection (mstsc.exe) is supported in this configuration, but Windows 10 Remote Desktop App is not supported in this configuration.
Managing ActiveWords Installed on Both the Local Computer and Remote Host.
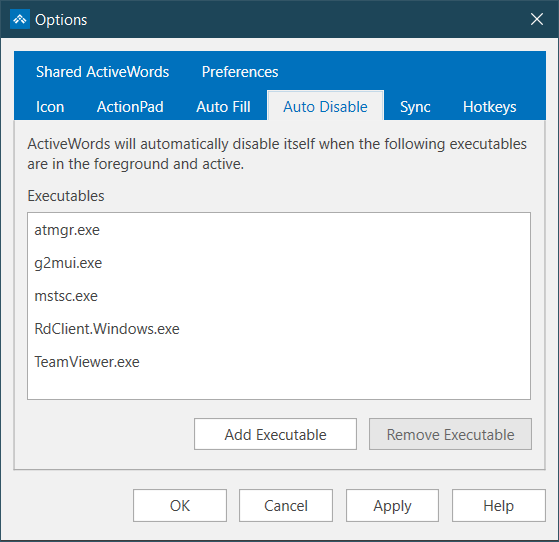
A local installation of ActiveWords may conflict with ActiveWords installed on a remote host. Several common remote access programs are listed by default in the Auto Disable tab of the Options dialog so that the local instance of ActiveWords will be ignored when a remote access window is active (avoiding any conflicts with the remote ActiveWords installation).
atmgr.exe - Cisco WebEx Client
g2mui.exe - Go2Meeting Client
mstsc.exe - Windows Remote Desktop Connection executable
RdClient.Windows.exe - Windows 10 Remote Desktop Universal App
TeamViewer.exe - TeamViewer
wfica32.exe - Citrix ICA Client
When ActiveWords is not installed on the remote host, the local remote host executable supporting the remote session should be removed from the above list to enable ActiveWords substitutions to the remote host.
CITRIX Technical References:
IT administrators can install ActiveWords once on a Windows Server to make the software available to server users.
Startup Behavior on Servers
To help administrators control licensing, ActiveWords does not automatically start for every server user by default. A user or administrator can start ActiveWords manually, then enable Run ActiveWords at Windows Logon in the Preferences tab of the Options dialog.
Enable Startup for Users
Administrators can turn auto-start on or off for a user or group of users by adding or removing this Registry entry:
HKEY_CURRENT_USER\Software\Microsoft\Windows\CurrentVersion\Run\ActiveWords
- Value name:
ActiveWords - Value data:
[drive]:\Program Files (x86)\ActiveWords 5\ActiveWords.exe
Enable Startup for All Users
Administrators can override the default behavior and cause ActiveWords to run at Windows logon for all users by running this command immediately after installing ActiveWords on the server and before launching ActiveWords:
[drive]\Program Files (x86)\ActiveWords 5\New User Auto Start Enable.cmd
Use New User Auto Start Disable.cmd to disable this behavior.
User Data and Licensing
When ActiveWords first starts for a user, it creates a data file for that logged-in user in \AppData\Roaming\ActiveWords 5 and requests license activation.
For enterprise activation workflows, see Activate/Deactivate Licenses in the Enterprise.
If the ActiveWords installer fails or shows an error, send the installer log files with your support request so the support team can see where installation stopped.
Submit a Support Ticket
Create a support ticket and include:
- The exact error message shown by the installer.
- Your version of Windows.
- The installer log files described below.
Find the Installer Logs
The installer log files are stored in this folder:
C:\Users\[username]\AppData\Local\Temp
The files are named like this:
ActiveWords_5_###....###.log
The numbers in the file name identify the installer log date.
Show the AppData Folder
- Open File Explorer.
- Select View, then turn on Hidden items.
- Open
C:\Users\[username]\AppData\Local\Temp. - Attach the relevant
ActiveWords_5log files to your support ticket.
Note: Windows 7 is no longer supported by Microsoft and is not maintained as a supported ActiveWords 5 platform.
ActiveWords includes internal commands that let you trigger common ActiveWords functions with Words.
Examples of Internal Commands
- Show the List View.
- Add Words and Actions.
- Import databases.
- Show or hide the floating icon.
ActiveWords Sync keeps your Words, Actions, and Tags available across your Windows devices by storing your ActiveWords data in a cloud-synced folder.
Note: You must have an account and the cloud service software installed on each computer where you want your Words and Actions to sync. Download links are listed below.
See video: Watch the video
Set Up Sync on Each ActiveWords Installation
- Install and sign in to your cloud service on each Windows device you want to sync.
- Right-click the ActiveWords floating icon or system tray icon and open Options.
- Select the Sync tab.
- Choose the cloud service you want to use.
- If your cloud service is not listed, or if you use a custom cloud folder location, choose Other and browse to the top-level local folder for that service.
- Click Apply.
When you click Apply, ActiveWords creates a folder named ActiveWords Sync inside the cloud service folder you selected.
Note: Do not rename or modify the contents of the ActiveWords Sync folder. Setting Sync to None removes the sync data file for that ActiveWords installation.
Supported Cloud Services
Sync should work with any cloud service that creates a local sync folder available through Windows Explorer. ActiveWords Sync is commonly used with services such as Dropbox, OneDrive, Box, and Google Drive.
OneDrive users may need to make the ActiveWords Sync folder available locally, depending on how OneDrive is configured.
How Sync Updates Your Data
Your ActiveWords data in the cloud updates automatically as you make changes. Changes are noted when you import, add, edit, or delete Words, Actions, and Tags.
When you move to another internet-connected device, the availability of recent changes depends on two things:
- How much time the previous device had to update the cloud folder.
- How quickly the cloud service updates the local folder on the next device.
Sync Requirements
- The cloud service must be installed and running on each device before enabling ActiveWords Sync.
- Each device must use the same cloud service account.
- The local top-level cloud folder may be in a different location on each device.
- ActiveWords Sync requires a functioning internet connection.
- The ActiveWords Sync folder must be available locally, not cloud-only.
Additional Notes
- Enabling ActiveWords Sync keeps the latest version of your ActiveWords database backed up in the cloud, even if you only use one device.
- OneDrive and some other cloud services may require you to manually mark specific folders as available offline. The ActiveWords Sync folder must maintain its content locally.
- Sync requires each database to contain a unique Windows
machine_guid. This identifies a specific Windows installation. - Sync may not work correctly if more than one computer has the same
machine_guid. This can happen when Windows installations are cloned.
Cloud Service Download Links
Related FAQs

To use ActiveWords Sync with Citrix ShareFile, create an ActiveWords Sync folder in ShareFile and then point each ActiveWords installation to that folder.
Create the ShareFile Folder
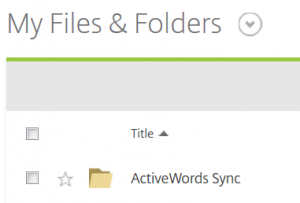
Log in to your ShareFile account and add an empty folder named ActiveWords Sync to My Files & Folders.
Set Up Each Computer
- Install ShareFile Sync for Windows. You must first have a ShareFile account.
- Follow the standard ActiveWords Sync instructions.
- Select Other in the ActiveWords Sync options dialog.
- Browse to and select this folder:
C:\Users\[username]\ShareFile\My Files & Folders.
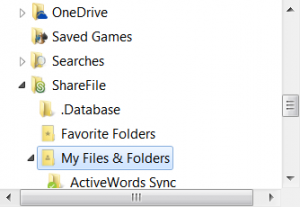
- Click Apply.
Note: ShareFile is an enterprise solution, so file and folder permissions may be managed by your IT staff. If ActiveWords Sync setup fails, consult your IT staff before contacting ActiveWords support.

When using ActiveWords Sync with Microsoft OneDrive, make sure the ActiveWords Sync folder is kept locally on each computer. OneDrive may otherwise keep files online-only, which can interfere with sync reliability.
Keep the Sync Folder Local
- After selecting OneDrive as the ActiveWords Sync cloud service, right-click the OneDrive system tray icon and select Settings.
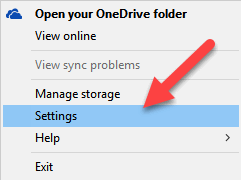
- Click Choose Folders.
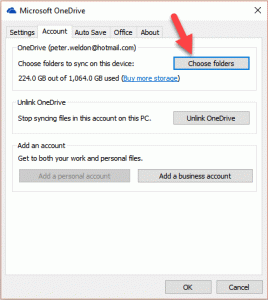
- If it is not already checked, check ActiveWords Sync, then click OK.
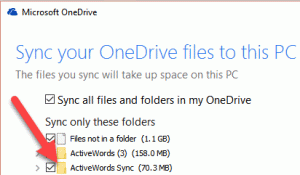
This glossary defines common ActiveWords terms used throughout the V5 support articles.
Core Terms
ActiveWord - A Word-Action association.
Action - A behavior carried out when a Word is Triggered.
There are seven Types of Actions:
- Substitute Text - plain text
- Substitute Content - formatted text and images
- Launch Program
- Open Document
- Open Folder
- Open Web Page
- Script
Word - A word, phrase, or text string associated with an Action.
- Words can contain any characters available on the keyboard, including symbols and delimiters.
Trigger - A means of having a Word carry out an Action. These include:
- Double Space
- Any delimiter (space, comma, etc.)
- A user defined ActiveWords Key (default is F8)
- Pressing the Enter Key when an Action is selected in the List View, ActionPad, or InkPad.
- Double clicking an Action selected in the List View.
- Clicking an Action in the ActionPad list.
- Clicking the GO button on the InkPad.
Interface Terms
List View - The list of Words and Actions used to search, add, edit, and delete.
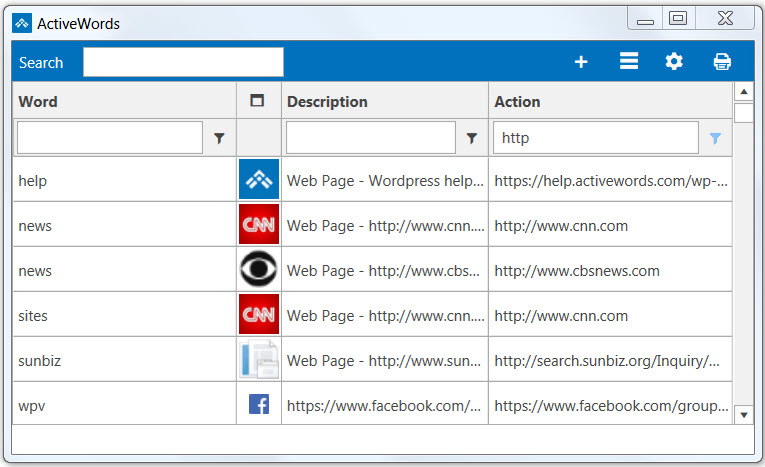
ActiveWords Icon - The icon that floats on the screen and appears in the System Tray when ActiveWords is running.


Text Monitor - The object on the screen that mirrors text entry and displays Action Descriptions when a Word is recognized or triggered.

ActionPad - The input field that appears on user demand where Words can be entered and triggered. (Useful when the user does not wish to enter a Word in their current context).
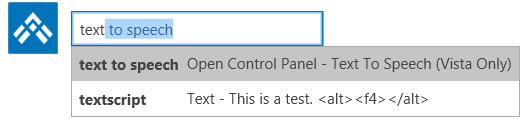
ActionText - A feature that acts on selected text and on text entered in the ActionPad. ActionText serves as your entry point for services and information, much like the Windows Key, only more powerful.
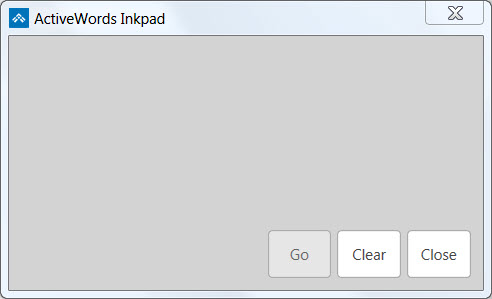
InkPad - The touch input area that appears on user demand where Words can be inked and triggered. Tap the Icon to open the InkPad on a touch screen.
Organization Terms
Tag - a word or phrase used to categorize Actions. See this link for more information.
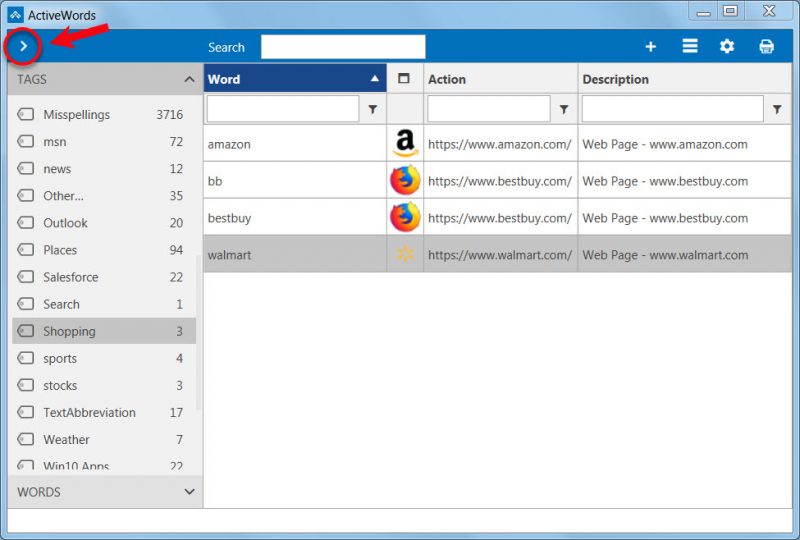
Tag View - The view showing Tags in the left column.
Pick List - A pop-up at the cursor location showing the Description of Actions associated with a Triggered Word when more than one Action is associated with the same Word. See this link for more information.
Addin - A set of Words and Actions with a focused purpose. Examples include Words and Actions for Outlook and for common English misspellings. See this link for current addins. Addins are free to use.
You can create Words and Actions by dragging files, folders, programs, selected text, web content, or images to ActiveWords. You can also copy and paste selected content into an Action field.
Common Drag and Drop Uses
- Drag files, folders, and programs to the ActiveWords icon to create Actions for opening them.
- Drag multiple files, folders, or programs at the same time to quickly add multiple Words and Actions.
- Drag selected content to the ActiveWords icon to create a new Action.
- Drag or paste selected content into an Action field to create Substitute Text or Substitute Content Actions.
See It In Action
Drag and Drop Reference
Drag'n drop to the Icon* | ||||||
| Drag'n drop Selected Content** | No Modifier Key | Control | ||||
| All Programs | Substitute Text | Substitute Content | ||||
| Drag'n drop browser Bookmark | No Modifier Key | |||||
| Chrome | Open Web Page | |||||
| Firefox | Open Web Page | |||||
| Edge | Not Supported | |||||
| Drag'n drop browser Address Bar URL | No Modifier Key | |||||
| Chrome | Open Web Page | |||||
| Firefox | Open Web Page | |||||
| Edge | Not Supported | |||||
| Drag'n drop Selected Content (Mixed Text, Links, Images**) | No Modifier Key | Control | ||||
| Chrome | Substitute Text | Substitute Content | ||||
| Firefox | Substitute Text | Substitute Content | ||||
| Edge | Substitute Text | Not Available | ||||
| Word Processor/Other Programs | Substitute Text | Substitute Content | ||||
| Drag'n drop Single Image from Web Page ** | No Modifier Key | Control | ||||
| Chrome | Substitute Content | Open Image Link | ||||
| Firefox | Substitute Content | Open Image Link | ||||
| Edge | Open Web Page | Open Web Page | ||||
| Drag'n drop Files | No Modifier Key | Control | ||||
| jpg | Substitute Content | Open File | ||||
| jpeg | Substitute Content | Open File | ||||
| gif | Substitute Content | Open File | ||||
| bmp | Substitute Content | Open File | ||||
| png | Substitute Content | Open File | ||||
| Drag'n drop Files | No Modifier Key | Control | Control Shift | |||
| html | Substitute Text | Substitute Content | Open File | |||
| docx | Substitute Text | Substitute Content | Open File | |||
| rtf | Substitute Text | Substitute Content | Open File | |||
| txt | Substitute Text | Substitute Content | Open File | |||
| Other file types | Open File | Open File | Open File |
Important Details
- Some programs, such as Excel, support copy and paste into the Action field of a Substitute Content Action but do not support drag and drop of selected content.
- Edge and Internet Explorer do not support drag and drop to create Substitute Content Actions. Use copy and paste into the Substitute Content Action field from Edge.
- Dragging only linked text from a browser creates an Open Web Page Action.
Note: Formatted content from different programs may not be an exact match in the Substitute Content Action field because source styles may not translate cleanly. You can edit the Action field to get the desired format. Learn more.
Note: Web content with links, images, and multiple content types may deliver different results depending on the browser and the design of the source page. You can edit the Substitute Content Action field after the content is added. Learn more.
The key to getting value from ActiveWords is adding Words and Actions for the text, content, places, files, and programs you use all the time.
What To Add
- Text segments you type repeatedly, such as your name, email address, signature, or standard responses.
- Content you regularly use in your work, such as legal terms, professional language, formatted snippets, or reusable templates.
- Websites, files, folders, and programs you frequently open.
Trigger Words Anywhere
The Words you associate with these Actions can be entered and triggered at any time, regardless of context. This gives you instant access to what you want and, for text and content substitutions, helps ensure accuracy while reducing typing errors.
Ways To Enter Words
- Physical keyboard
- Virtual or touch keyboard
- InkPad, where you can ink or draw your Words
See It In Action
Adding Words and Actions is easy. Watch the video.
The Advanced Calculator lets you perform math calculations directly in the ActionPad. Type a numeric expression and press Enter—the result is substituted immediately. This is useful for quick calculations without leaving your workflow. It supports basic arithmetic plus many advanced functions, constants, and operators; the full scope is too large to document here.
Enabling the Advanced Calculator
Open Options and go to the ActionPad tab. Turn on Advanced Calculator to use math expressions in the ActionPad. When enabled, expressions such as 25*4 or 100/3 are evaluated and the result is inserted.
Using the Advanced Calculator
Open the ActionPad (default: Ctrl+Space), type a math expression, and press Enter. The result is delivered in the context where you were working—for example, into a document, email, or Notepad. Expressions that start with a number (e.g. 1+2, 25*4) are evaluated automatically. If your expression starts with a function or constant (e.g. sqrt, sin, pi), type = first so the calculator recognizes it. For example, =sqrt(16) or =sin(pi/2). Examples:
1+2→ 31+2/3+(4*5-10)→ mixed arithmetic2*pior=sqrt(16)→ constants and functions=sin(pi/2)→ 1=sum(n, 1, 100, 1/n^2)→ summation (e.g. sum of 1/n² from n=1 to 100)=int(sqrt(1-x^2), x, -1, 1)→ definite integral (π/2)
Note: When you press Enter, the calculated result is inserted directly into the application where your cursor is currently located (for example, in Notepad, a document, or an email).
See it in action
Related FAQs
- ActionPad – Overview and configuration
- Date Calculations – Date arithmetic in the ActionPad
- Windows Search – Search files, folders, and applications
ActiveWords can be used as a universal AutoCorrect system that works beyond Microsoft Word.
Why ActiveWords Goes Beyond AutoCorrect
Microsoft AutoCorrect is a good way to fix common typing mistakes inside Microsoft Office applications. ActiveWords extends that idea across Windows, so your correction Words can work wherever you type.
Key Differences
- Works anywhere: ActiveWords corrections can trigger in applications across Windows.
- Uses all Action types: ActiveWords can trigger Substitute Text, Substitute Content, Launch Program, Open URL, Script, and other Actions.
- Supports reusable Words: You can build your own correction library and manage it in the ActiveWords List View.
ActiveWords can automatically back up your data, and you can also create a manual backup whenever you want an extra copy.
Automatic Backups
ActiveWords stores automatic backups here:
C:\Users\[username]\AppData\Roaming\ActiveWords 5\Backups
Automatic backups are turned on by default. To change the backup frequency or turn automatic backups off, use the backup control on the Preferences tab of the Options dialog.
AppData and System Backups
The AppData folder is a special Windows folder that is hidden by default. Most backup programs, including Windows Backup, include AppData in the standard backup process. If you regularly back up your Windows data, your ActiveWords data is likely included as part of that larger backup.
Create a Manual Backup
- Right-click the ActiveWords floating icon or system tray icon and select Options.
- Select the Preferences tab.
- Check Show advanced tools and options.
- Close the Options dialog.
- Right-click the ActiveWords icon again and select Advanced, then Backup.
- Choose the folder where you want to save the backup, then click Save.
ActiveWords uses the Windows Clipboard for some substitution delivery. Understanding these settings can help if substitutions are replacing clipboard contents or if large substitutions behave unexpectedly.
When ActiveWords Uses the Clipboard
- Substitute Text Actions of 40 characters or more use the Windows Clipboard by default to speed delivery.
- Substitute Content Actions always use the Windows Clipboard, regardless of size.
Show Advanced Clipboard Options
- Open the ActiveWords Options dialog.
- Select the Preferences tab.
- Check Show advanced tools and options.
- Select the Advanced tab.
Clipboard Controls
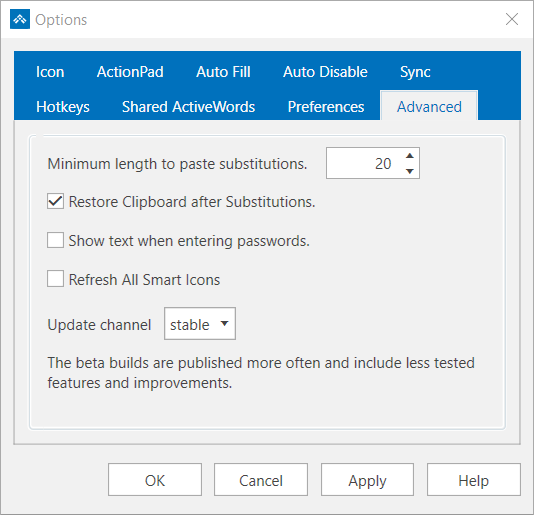
- Minimum length to paste substitutions: Substitute Text Actions shorter than this character count are delivered by simulating keystrokes instead of using the Clipboard. Simulating keystrokes can be slower.
- Restore Clipboard after Substitutions: ActiveWords restores the clipboard contents that existed immediately before the Substitute Action was triggered.
Note: If Restore Clipboard after Substitutions is turned on, timing issues may occasionally cause prior clipboard contents to be substituted instead of the intended Action. Turn this option off if you want to avoid that risk.
We welcome your questions, suggestions, and issue reports. If your question is not answered on the Support page, contact the ActiveWords support team.
Contact Support
Create a support ticket and describe the question or issue in detail.
Include Technical Details
For technical issues, include enough detail for support to reproduce the issue:
- What you expected ActiveWords to do.
- What happened instead.
- Your version of Windows.
- Your most recent ActiveWords log file.
Find the Log File
Your most recent log file is stored here:
C:\Users\[username]\AppData\Roaming\ActiveWords 5\Logs\
- Copy this path:
%appdata%\ActiveWords 5\Logs - Press Win-r.
- Press Ctrl-v, then Enter.
- Drag the most recent
ActiveWords.logfile to the support ticket.
Create date and/or time stamps as Substitute Text Actions or embed the date/time syntax within larger Substitute Text or Substitute Content Actions. Different Actions can be created to substitute the date and/or time in different formats and with different content. Note that the date/time commands will not work within Scripting Actions, only in Substitutions. See video: Watch the video
Usage
Here are example formats using the date and time formatting syntax detailed below.
${datetime %B %d, %Y} Delivers: August 10, 2016
${datetime %d %B, %Y} Delivers: 10 August, 2016
${datetime %y-%m-%d} Delivers: 16-08-10
${datetime %d-%m-%Y} Delivers: 10-08-2016
${datetime %I:%M %p} Delivers: 02:31 PM
${datetime %H:%M:%S} Delivers: 14:31:19
Date Time - Action: ${datetime %B %d, %Y %I:%M %p} Delivers format: August 10, 2016 02:31 PM
Date Time Format Syntax
The following syntax is used in the Action field to substitute the current date and/or time in various formats.
Note: The formats that include "#" are specific to Microsoft Windows.
%a - Abbreviated weekday name.
%A - Full weekday name.
%b - Abbreviated month name.
%B - Full month name.
%c -Date and time representation appropriate for locale. Use %#c for long date and time representation, appropriate to current locale.
%d - Day of month as decimal number (01 – 31). Use %#d to remove leading zeros (if any).
%H - Hour in 24-hour format (00 – 23). Use %#H to remove leading zeros (if any).
%I - Hour in 12-hour format (01 – 12). Use %#I to remove leading zeros (if any).
%j - Day of year as decimal number (001 – 366). Use %#j to remove leading zeros (if any).
%m - Month as decimal number (01 – 12). Use %#m to remove leading zeros (if any).
%M - Minute as decimal number (00 – 59). Use %#M to remove leading zeros (if any).
%p - Current locale's A.M./P.M. indicator for 12-hour clock.
%S - Second as decimal number (00 – 59). Use %#S to remove leading zeros (if any).
%U - Week of year as decimal number, with Sunday as first day of week (00 – 53). Use %#U to remove leading zeros (if any).
%w - Weekday as decimal number (0 – 6; Sunday is 0). Use %#w to remove leading zeros (if any).
%W - Week of year as decimal number, with Monday as first day of week (00 – 53). Use %#W to remove leading zeros (if any).
%x - Date representation for current locale. Use %#x for long date representation, appropriate to current locale.
%X - Time representation for current locale.
%y - Year without century, as decimal number (00 – 99). Use %#y to remove leading zeros (if any).
%Y - Year with century, as decimal number. Use %#Y to remove leading zeros (if any).
%z, %Z - Time-zone name or abbreviation; no characters if time zone is unknown.
%% - Percent sign.
Date Calculations let you perform date arithmetic directly in the ActionPad and in your actions. Type expressions like today+1m and the result is substituted immediately—no need to look up the date yourself.
Enabling Date Calculations
Open Options and go to the ActionPad tab. Turn on Date Calculations to use date expressions in the ActionPad. On the same tab, set the date format for results: Short date or Long date. Short date is typically numeric (e.g. 3/3/2025); long date includes the day and month name (e.g. Monday, March 3, 2025). The format you choose here applies when you insert a date from the ActionPad or from an action.
Using Date Calculations in the ActionPad
Type a date expression in the ActionPad and press Enter. Use the single-letter units d, w, m, and y (not "day", "week", "month", or "year"). For example:
today+1m– One month from todaytoday+1w– One week from todaytoday-1d– Yesterdaytoday+1y– One year from today
Note: Do not put spaces in date expressions. Use today+1m, not today + 1 m.
See it in action
Set the date format (Short date or Long date) in Options → ActionPad.
Then open the ActionPad, type a date expression (e.g. today or today+1w), and press Enter. The result is inserted where your cursor is.
Using Date Calculations in Actions
Date calculations work in Substitute Text and Substitute Content actions too. You can embed date expressions within larger text—for example, a letter header that includes "long date minus one day" so the date updates automatically. This is useful for templates, reports, and any action where the date should reflect today or a relative date.
Related FAQs
- ActionPad – Overview and configuration
- Advanced Calculator – Math expressions in the ActionPad
- Windows Search – Search files, folders, and applications
Date math in actions lets you embed a relative date (for example, “today + 1 week” or “today − 1 day”) inside an action so the correct date is generated automatically when you trigger the Word. This is useful for templates, reports, follow-up emails, and any text that should always reflect the current date.
Examples
You can type date expressions directly in actions (for example, in Substitute Text or Substitute Content) and combine them with normal text:
today– Today’s datetoday+1w– One week from todaytoday-1d– Yesterdaytoday+1m– One month from todaytoday+1y– One year from today
Note: Do not include spaces in date expressions. Use today+1w, not today + 1 w.
How to Use Date Math in an Action
- Create or edit a Word.
- Choose an action type that inserts text (for example, Substitute Text or Substitute Content).
- Type your text and include the date expression where you want the date to appear.
- Save the Word. When you trigger it, ActiveWords evaluates the date expression and inserts the resulting date.
Choosing the Date Format
The output format (Short date vs Long date) is set in Options → ActionPad under the date settings. The format you choose there is used when date expressions are expanded in the ActionPad and in actions.
Related FAQs
- Date Calculations – Date arithmetic in the ActionPad
- ActionPad – Overview and configuration
- List View – Create and edit actions
Addins are sets of Words and Actions built for specific programs or purposes. Addins use the .awdb file extension and insert their content into your local ActiveWords data when opened.
Install an Addin
You can find free Addins on the ActiveWords Addins page. Open an Addin file to add its Words and Actions to your current ActiveWords installation.
Example Addin
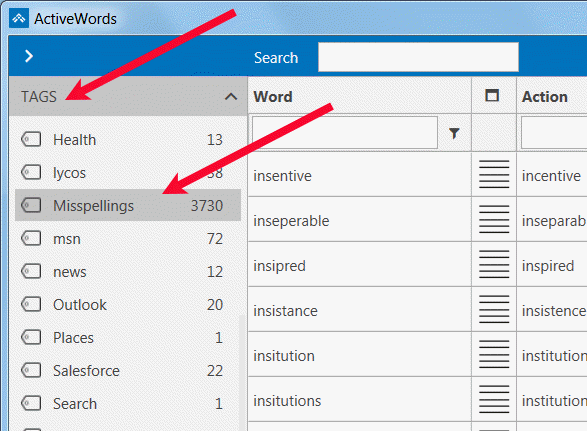
The English Misspellings Addin includes over 3,400 Actions that automatically correct over 5,300 commonly misspelled English words as you type.
Find Addin Content Later
Each Addin includes a Tag so you can locate, review, and edit its Words and Actions as needed.
Hotkeys are system-wide key combinations that give you instant access to ActiveWords features. In ActiveWords 5, hotkey management is more flexible and organized. Hotkeys are configured in two primary places:
- In the main ActiveWords window (where you edit individual actions)
- In Options (Hotkeys tab and ActionPad tab)
Where to Configure Hotkeys
Hotkeys are configured either in Options or in the main ActiveWords window, depending on the type of hotkey.
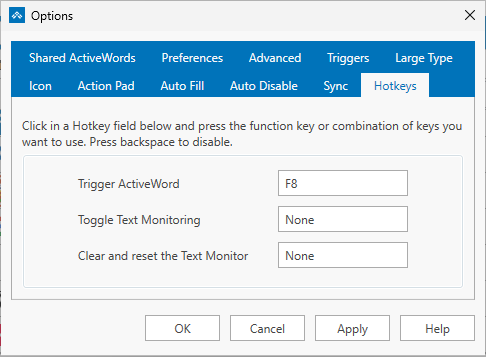
Options → Hotkeys tab – Use this tab for the three system hotkeys that do not relate to a specific action:
- ActiveWords Key (default: F8) – Press after typing a Word to trigger it, or use with selected text for Selected Text actions
- Text Monitoring – Turn text monitoring on or off
- Pause Word recognition – Pause until the next delimiter is entered
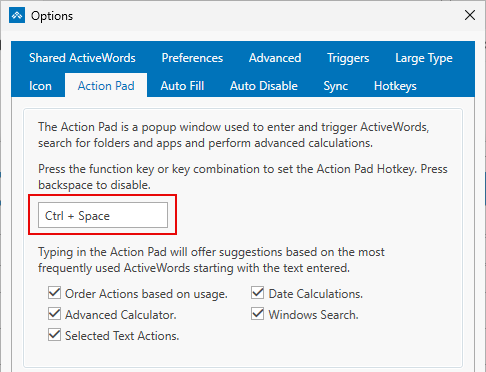
Options → ActionPad tab – Use this tab for the ActionPad hotkey (default: Ctrl+Space). In V5, the ActionPad hotkey is configured in one place only to avoid confusion.
Main ActiveWords window – Assign hotkeys to individual actions here. Open the main ActiveWords window, right-click an action, and set your preferred hotkey in the action editor.
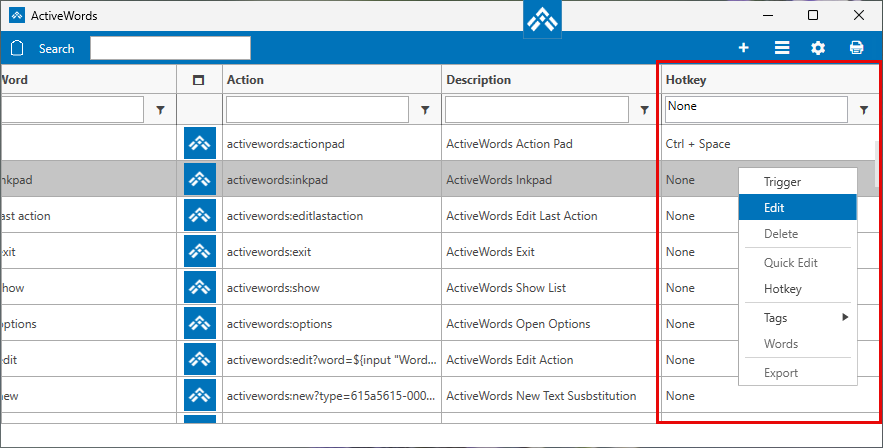
Assigning a Hotkey
To set a hotkey, simply press the key combination you want on your keyboard. ActiveWords captures it and assigns it. No need to type or select from a list.
Using the Same Hotkey for Multiple Actions
You can assign the same hotkey to multiple actions. When you press that hotkey, ActiveWords displays a Pick List showing all actions that use it. Select the one you want and it runs immediately.
This is useful when you want one key to access several related actions—for example, multiple Selected Text actions (Bing, Google Translate, LinkedIn) or several frequently used Words.
Note: You can change hotkeys for multiple actions at once from the main ActiveWords window: select multiple actions, right-click, then choose Hotkey (or the equivalent hotkey command) and press the key combination you want.
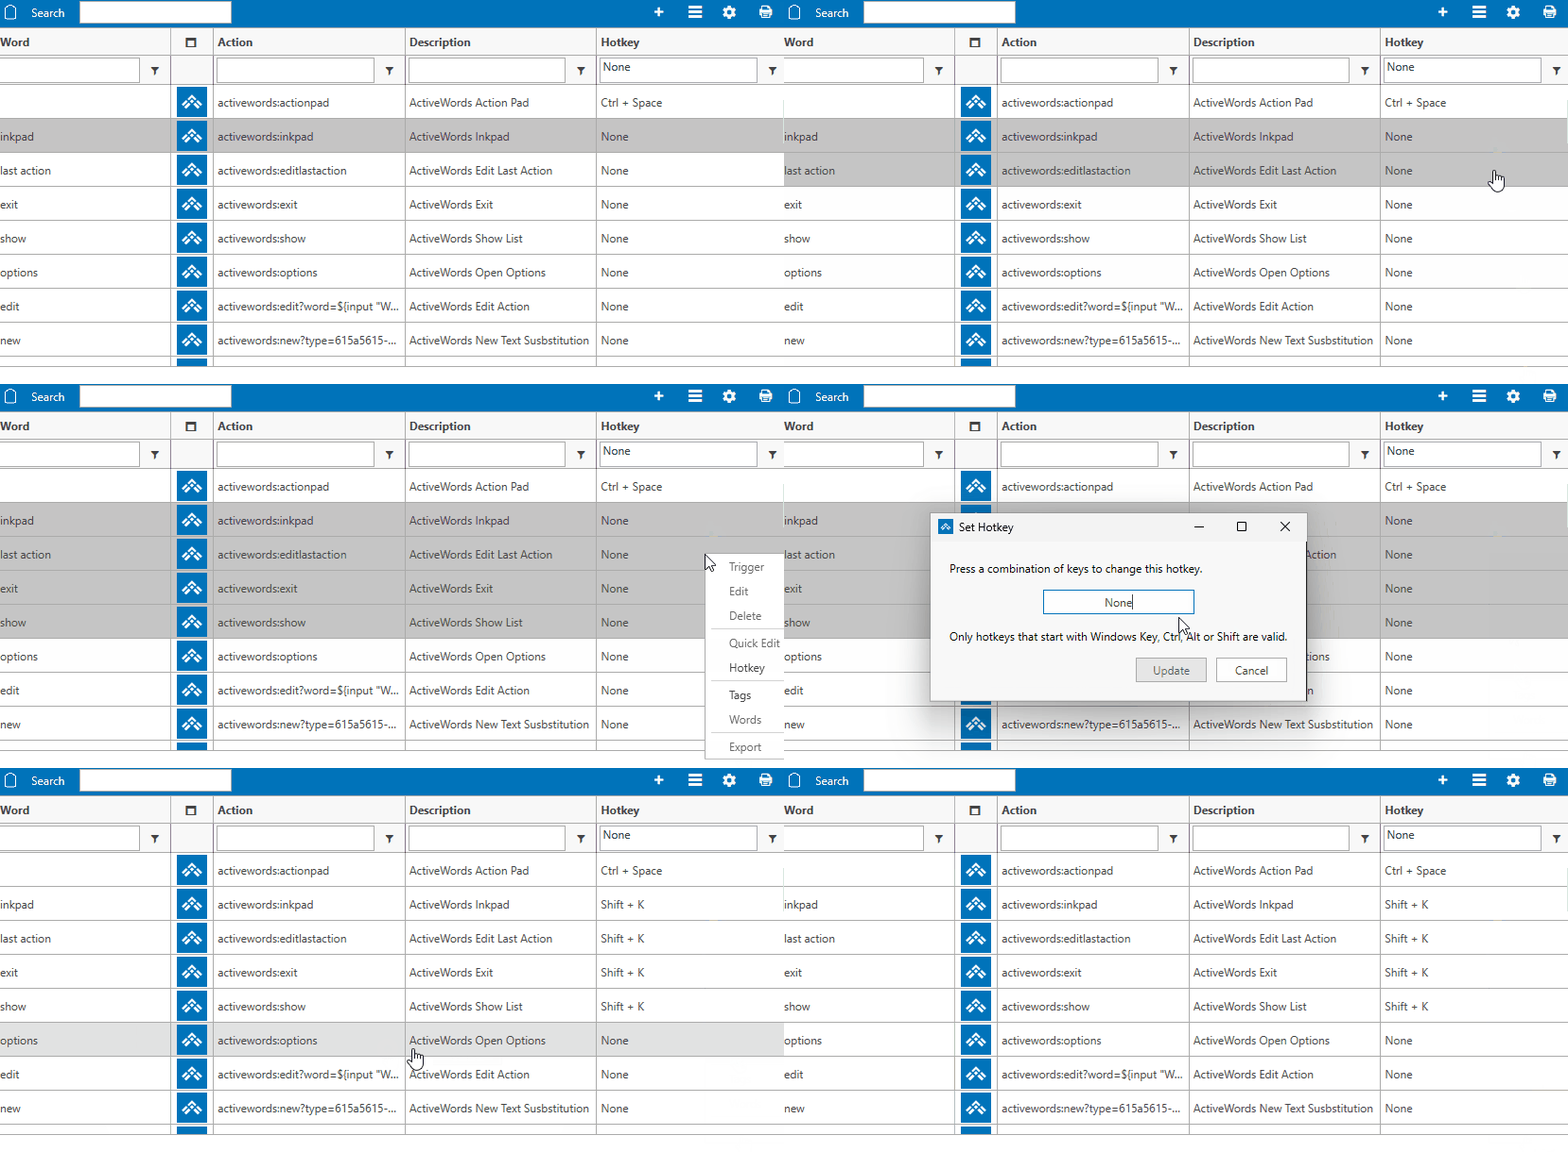
What's Different in Version 5
- ActionPad hotkey – Now configured only in the ActionPad tab (previously available in multiple places)
- Per-action hotkeys – Assign hotkeys directly when editing any action
- Shared hotkeys – Multiple actions can share the same hotkey; a Pick List lets you choose which one to run
Related FAQs
- ActionPad – Configure the ActionPad hotkey
- Selected Text – Assign hotkeys to Selected Text actions
- Pick Lists – When multiple actions share a hotkey
Import and Restore are different operations in ActiveWords. Use Import when you want to add data to your current ActiveWords installation. Use Restore only when you want to replace the current data with a full backup.
Use Import To Add Data
Import inserts ActiveWords data into your current installation without replacing everything already there. Use Import for:
- ActiveWords data files, including
.awdbfiles and.awbkbackups. - ActiveWords 4
.awbbackup files. .csvfiles formatted for ActiveWords import.
See Importing External Data for more detail.
Use Restore To Replace Data
Restore is a full replacement operation. Restoring a backup overwrites the ActiveWords data currently installed on that computer.
Note: Restore also overwrites license information. If you restore backup data from another user or computer, ActiveWords may show an invalid license until the correct license is restored.
ActiveWords can import data from ActiveWords data files, CSV files, and Microsoft Word AutoCorrect entries.
Import ActiveWords Data Files
ActiveWords data files use the .awdb extension. Open a file directly, or import it from the ActiveWords icon right-click menu by selecting Import. ActiveWords data files include free Addins and .awdb files exported from ActiveWords.
Import CSV Data Files
Watch the video for instructions on importing CSV files into ActiveWords.
Download the ActiveWords 5 CSV Import Template.
Examples of CSV imports include:
- Product codes linked directly to URLs with product information.
- Stock trading symbols linked directly to URLs with quotes and company information.
- Words that trigger when followed by a single delimiter, including corrections such as
do'nt<space>todon't<space>. - Enterprise terms linked to approved text substitutions, such as liability waiver.
Import Microsoft Word AutoCorrect Data
ActiveWords can import Microsoft Word plain text AutoCorrect entries. The Word Replace text as you type control remains active if it was active at the time of import. ActiveWords Substitute Text Actions dominate AutoCorrect entries.
InkPad lets you use ActiveWords with touch input. Tap the ActiveWords icon to open InkPad, write your Word, then tap GO to trigger the associated Action.
Touch Options
- Use InkPad to ink or draw a Word on a touch screen.
- Use the Windows on-screen keyboard to type Words without a physical keyboard.
See It In Action
Before installing ActiveWords 5, it’s important to understand how it interacts with existing versions and what happens during an upgrade.
This article explains what happens when you install ActiveWords 5 and how to proceed safely.
What to Know Before Installing
ActiveWords 5 replaces ActiveWords 4 during installation and uses a new internal database format.
Before installing, keep in mind:
- ActiveWords 5 replaces ActiveWords 4 during installation
- Some changes are not backward-compatible
- Documentation is still evolving alongside the product
If you depend on ActiveWords daily for critical workflows, review this information carefully.
What Happens When You Install ActiveWords 5
When you install ActiveWords 5, it replaces ActiveWords 4 on your system and begins using a new internal database format.
At install time:
- Your existing ActiveWords data is preserved
Note: Your ActiveWords data is stored in your Windows user profile, not in the Program Files folder. When you install ActiveWords 5, your data is saved here:
%AppData%\Roaming\ActiveWords. If you previously used ActiveWords 4, you may also see this folder:%AppData%\Roaming\ActiveWords4. This is why upgrading to ActiveWords 5 does not remove your existing data. Each version stores its data in its own folder. - ActiveWords 4 is automatically removed
- ActiveWords 5 starts using its own database structure
Your existing actions are available immediately after installation. However, any actions you create or modify in ActiveWords 5 are handled differently due to the new database format.
Returning to ActiveWords 4 If Needed
Installing ActiveWords 5 does not permanently lock you in.
If you decide to return to ActiveWords 4, you can:
- Uninstall ActiveWords 5
- Reinstall ActiveWords 4
When you return to ActiveWords 4:
- ActiveWords 4 uses its original data
- Actions created or modified in ActiveWords 5 do not appear
This lets you return to ActiveWords 4 if needed without risking your existing setup.
Important: ActiveWords 5 uses a new database structure. Actions that are created or edited in ActiveWords 5 cannot be used in ActiveWords 4, and if you switch back to ActiveWords 4, any changes made in ActiveWords 5 will not carry over. This behavior is expected and supports future development.
Recommended Upgrade Approach
To upgrade to ActiveWords 5 safely:
- Avoid making large structural changes if you expect to return to V4
- Use ActiveWords 5 for new features and workflows
- Keep in mind that ActiveWords 5 uses a separate database from ActiveWords 4
Power users with large action libraries should be especially mindful of this distinction.
Who Should Install ActiveWords 5
ActiveWords 5 is available to:
- Existing users ready to move to the new version
- Power users who understand the database compatibility notes above
What to Read Next
To better understand how ActiveWords 5 manages data and why compatibility differs from previous versions, read:
Wireless keyboards can sometimes be less reliable for high-speed text entry because they compete with other processes for CPU time while polling the USB port for data.
If Characters Are Missing or Duplicated
- Exit unnecessary programs to free CPU cycles.
- Try a wired keyboard for the most reliable keyboard entry.
- If the issue continues in a specific application, contact support with the application name and a brief description of the behavior.
Some programs and system utilities can interfere with ActiveWords keyboard monitoring, substitution delivery, or startup behavior.
Security and Utility Conflicts
- Webroot: Webroot security software may block ActiveWords keyboard monitoring in Internet browsers, especially if you use a Webroot browser Addin or extension. Set this file to Allow:
C:\Program Files (x86)\ActiveWords 5\ActiveWords.exe. - Malwarebytes: Malwarebytes is known to periodically remove files from the ActiveWords program folder. We recommend whitelisting
C:\Program Files (x86)\ActiveWords 5\. - MacroExpress: MacroExpress may interfere with ActiveWords keyboard monitoring and may cause the simulated depression of the Shift key.
- Keyboard or mouse monitors: Programs that monitor the keyboard or mouse may interfere with ActiveWords keyboard monitoring.
- SnagIt: A temporary delay in keyboard and mouse responsiveness may occur on ActiveWords startup if SnagIt is running. If you experience this, contact support.
Application-Specific Limitations
- Classic Shell and Classic Start 8: These programs can conflict with ActiveWords substitutions.
- Substitute Content images: Images inside Substitute Content Actions may not appear in the triggered result if the receiving application does not accept that image format. If your application supports formatted content but does not accept images from Substitute Content Actions, contact support.
- Time Matters: If substitutions do not work correctly in Time Matters, try turning off its Auto Text function. If the setting has not changed, it is available at File > Setup > General > User Level > Forms > Set Options for All Forms > AutoText.
ActiveWords is Unicode compliant, so substitutions can be created and triggered in any Windows language.
Use Words and Actions Across Languages
You can associate a Word in one language with an Action in another. For example, horse can trigger лошадь in Russian.
ActiveWords can be used with Western European, Cyrillic, Arabic, Hindi, Kanji, Chinese, and other languages supported by Windows.
Large Type is a quick way to display selected text in a large, easy-to-read view—useful for presentations, reading small print, confirming a value before pasting it, or reviewing text at a distance.
How to Use Large Type
- Select (highlight) the text you want to view.
- Trigger Large Type (for example, by using Selected Text or a specific hotkey if you’ve assigned one).
- ActiveWords displays the selected text in a large view so it’s easy to read.
Note: Large Type uses your currently selected text. If nothing is selected, select the text first and then trigger Large Type.
Common Uses
- Readability – Quickly make small text readable without changing app zoom settings.
- Double-check before you paste – Confirm a number, address, or short excerpt before inserting it into a form or email.
- Share on-screen – Show a snippet to someone nearby without handing over your keyboard.
Related FAQs
- Selected Text – Use highlighted or pasted text in actions
- ActionPad – Search and run actions
- Hotkeys – Configure keyboard shortcuts
You can include command line switches in Actions that launch programs. Switches let you open a program with specific behavior or input.
Outlook Example
This example opens a new Outlook email message and puts Tom Smith in the To field:
"outlook.exe" /c ipm.note /m "Tom Smith"
Microsoft Word Template Example
This opens a Microsoft Word template file as a template:
"winword.exe" /t c:\coverletter.dotx
This opens a regular document using the template:
"winword.exe" /tc:\coverletter.dotx
Note: Use straight quotation marks around file paths or switch values that contain spaces.
Drag and drop is a quick way to create Substitute Content Actions, but sometimes the imported formatting is not exactly what you need. You can manually create or edit Substitute Content Actions using the tools built into ActiveWords.
When To Edit Manually
- Web page or document formatting does not paste cleanly.
- You need to adjust text, spacing, links, or images after creating the Action.
- You want more control than drag and drop provides.
See It In Action
You can move ActiveWords windows, including List View, Add/Edit, and Options, between monitors.
How ActiveWords Handles Multiple Monitors
- When an ActiveWords window is moved to another monitor, other ActiveWords windows appear on that monitor too.
- The ActiveWords icon and Text Monitor stay bounded within the primary monitor defined in Windows Settings.
- You can keep List View on one monitor for quick reference while working on another monitor.
If a website does not work well in your Windows default browser, create an ActiveWords Launch Program Action that opens the URL in a specific browser.
Action Format
Use the browser executable in straight quotation marks, followed by a space and the URL.
Note: Use plain text quotation marks ("), not curly quotes.
Firefox Example
To open the ActiveWords home page in Mozilla Firefox, put this in the Program to Launch field:
"firefox.exe" https://www.activewords.com
Chrome Example
To open the ActiveWords home page in Google Chrome, put this in the Program to Launch field:
"chrome.exe" https://www.activewords.com
Use Options to configure how ActiveWords looks, starts, triggers Actions, fills in new Words, syncs your data, and handles advanced settings. Right-click the ActiveWords floating icon or the ActiveWords icon in the system tray, then choose Options.
ActiveWords 5 has eleven Options tabs, listed alphabetically across the top of the dialog. Every tab shares the same four buttons at the bottom: OK saves and closes, Cancel discards your changes, Apply saves without closing, and Help opens support.
Options Tabs
- Action Pad: what the Action Pad searches, its hotkey, and how it looks
- Advanced: default Action type, substitution delivery, and updates
- Auto Fill: description prefixes and Word suggestions when you add an Action
- Auto Disable: programs that switch ActiveWords off while they are in front
- Hotkeys: the three system hotkeys
- Icon: the floating icon and the Monitor text
- Large Type: font, size, and colors for the Large Type display
- Preferences: startup, backup, and typing behavior
- Shared ActiveWords: shared databases you subscribe to
- Sync: the cloud service used to sync or back up your data
- Triggers: built-in and custom Triggers, and the default for new Words
Note: In ActiveWords 4 the Triggers tab and some advanced tools were hidden until you checked Show advanced tools and options on the Preferences tab. ActiveWords 5 removes that checkbox. Every tab and every entry on the icon menu's Tools submenu is available all the time.
Action Pad
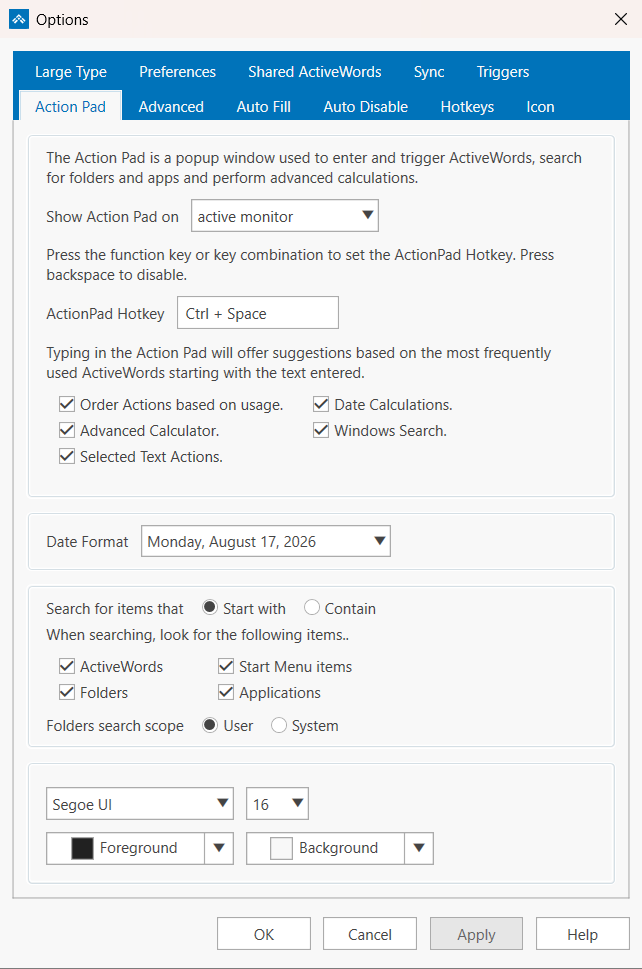
The Action Pad tab controls the popup window you use to enter and trigger Words, search your computer, and run calculations. It has four groups.
- Show Action Pad on: which display the Action Pad opens on. Choose primary monitor, mouse monitor, or active monitor.
- ActionPad Hotkey: the key combination that opens the Action Pad,
Ctrl + Spaceby default. Click in the field and press the keys you want. Press Backspace to disable it. This is the only place in Options where the Action Pad hotkey is set. - Order Actions based on usage.: suggestions are ranked by the Words you use most.
- Date Calculations., Advanced Calculator., Selected Text Actions., and Windows Search.: turn each kind of result on or off.
- Date Format: how dates are written when the Action Pad returns one. Eleven formats are offered, from
8/17/2026toMonday, August 17, 2026. - Search for items that: Start with or Contain what you type.
- When searching, look for the following items..: ActiveWords, Folders, Start Menu items, and Applications.
- Folders search scope: User limits the search to your own user profile, System searches the whole computer.
- Appearance: the font, size, Foreground color, and Background color of the Action Pad.
Note: Clearing Windows Search. greys out the whole lower group, including the item checkboxes and both sets of radio buttons. Leave Windows Search. checked if you want to change what the Action Pad looks for or how it matches.
See ActionPad and Windows Search for more on this tab.
Advanced
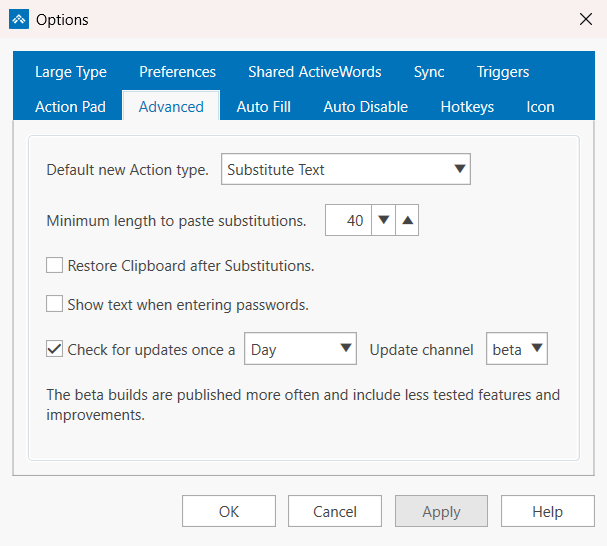
- Default new Action type.: the Action type pre-selected when you create a new Action. Any of the eight types can be the default: Launch Program, Launch Windows App, Open Document, Open Folder, Open URL, Script, Substitute Content, or Substitute Text.
- Minimum length to paste substitutions.: substitutions shorter than this many characters are typed out as keystrokes instead of pasted. The default is 40, and the range is 5 to 256.
- Restore Clipboard after Substitutions.: puts your previous Clipboard contents back after a pasted substitution.
- Show text when entering passwords.: normally ActiveWords stops monitoring in password fields. Check this if you want typed text shown in the Monitor there as well.
- Check for updates once a Day, Week, or Month, and the Update channel: stable or beta. Beta builds are published more often and include less tested features.
See Clipboard Issues and Password Fields and the Text Monitor for the settings on this tab that affect substitutions and monitoring.
Auto Fill
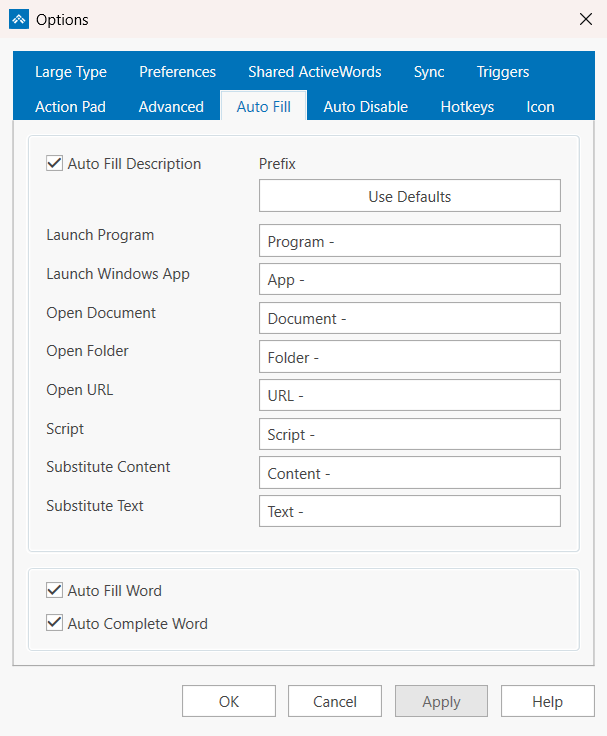
Auto Fill Description writes a description for you when you create an Action, using a prefix that depends on the Action type. You can edit any prefix, and Use Defaults puts them all back. The eight prefixes are:
- Launch Program:
Program - - Launch Windows App:
App - - Open Document:
Document - - Open Folder:
Folder - - Open URL:
URL - - Script:
Script - - Substitute Content:
Content - - Substitute Text:
Text -
Two more settings control the Word itself. Auto Fill Word suggests a Word based on what you are adding, and Auto Complete Word completes the Word as you type it.
Auto Disable
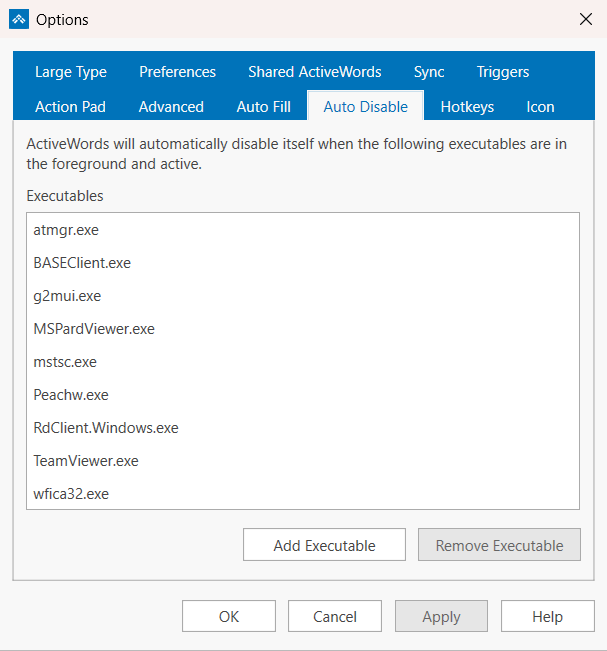
ActiveWords disables itself automatically while any program on this list is in the foreground and active. The list ships with remote access and terminal clients already in it, such as mstsc.exe, TeamViewer.exe, wfica32.exe, and RdClient.Windows.exe, because Words typed inside a remote session belong to the remote computer. Use Add Executable and Remove Executable to change the list.
See ActiveWords and Remote Access for how this works in a remote session.
Hotkeys
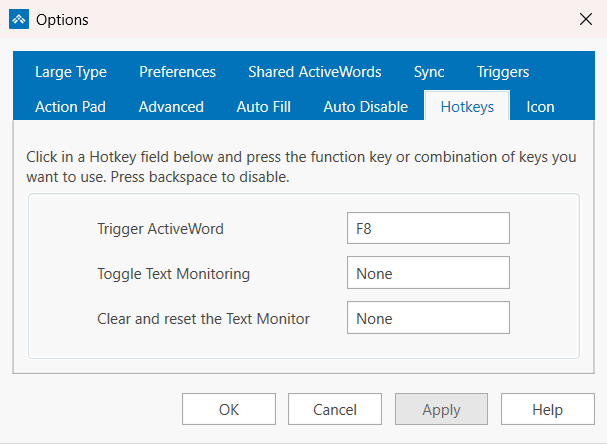
Click in a Hotkey field and press the function key or key combination you want. Press Backspace to disable it. Three system hotkeys live here:
- Trigger ActiveWord: the ActiveWords Key,
F8by default. Press it after typing a Word to trigger it, or use it with selected text. - Toggle Text Monitoring: turns text monitoring on and off. Not set by default.
- Clear and reset the Text Monitor: empties the Monitor and starts it fresh. Not set by default.
The Action Pad hotkey is not on this tab. It is set on the Action Pad tab. Hotkeys for individual Actions are set in the Action editor. See Hotkeys.
Icon
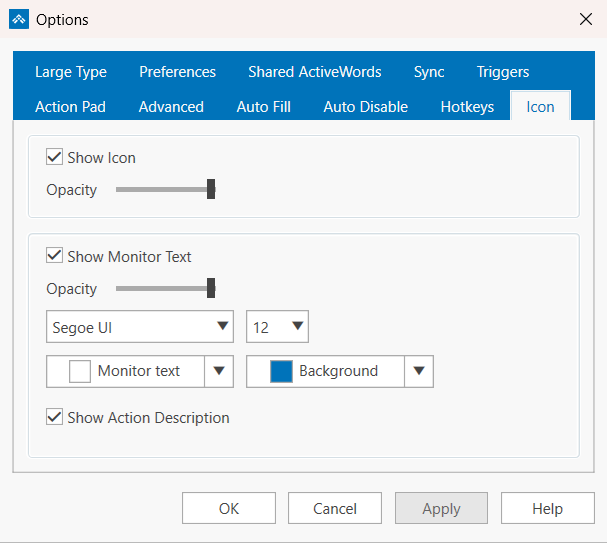
This tab covers the floating ActiveWords icon and the Monitor text that appears next to it.
- Show Icon and its Opacity slider control whether the floating icon appears and how solid it looks.
- Show Monitor Text and its own Opacity slider control the Monitor, which shows what ActiveWords has seen you type.
- The Monitor's font, size, Monitor text color, and Background color are all set here.
- Show Action Description adds the Action's description to the Monitor when a Word is recognized.
You can also hide the icon or the Monitor straight from the icon's right-click menu, using Hide Icon and Hide Monitor.
Large Type
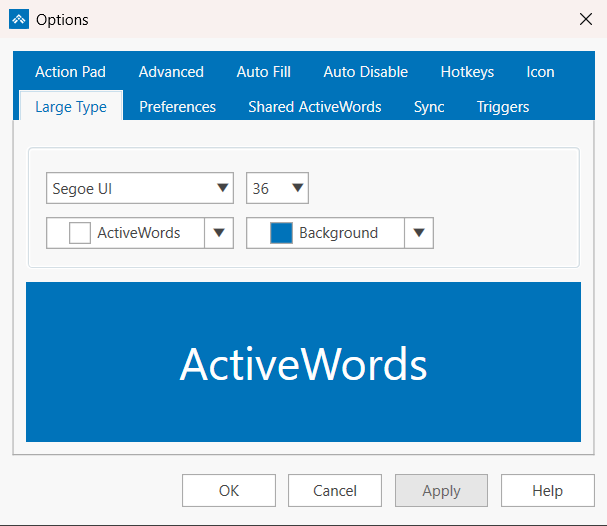
New in ActiveWords 5. Set the font, size, text color, and Background color used by the Large Type display. A live preview below the controls shows the result as you change it, so you can check readability before you close Options. The defaults are Segoe UI at 36 points, white text on ActiveWords blue.
See Large Type for how to display selected text this way.
Preferences
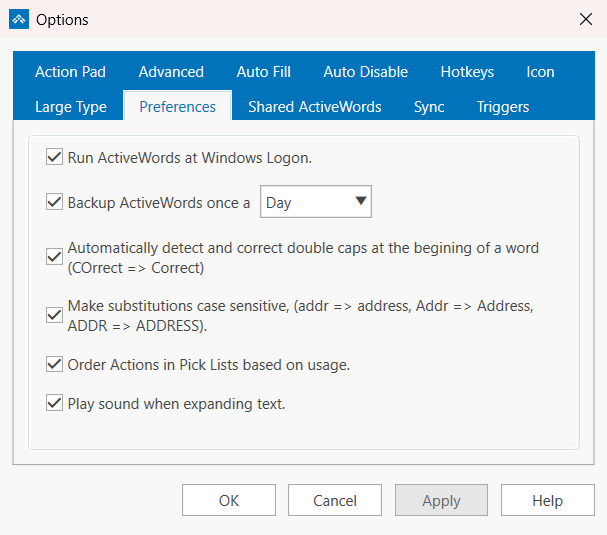
- Run ActiveWords at Windows Logon.: starts ActiveWords with Windows.
- Backup ActiveWords once a Day, Week, or Month: schedules an automatic backup of your data.
- Automatically detect and correct double caps at the begining of a word (COrrect => Correct): fixes two capitals at the start of a word as you type.
- Make substitutions case sensitive, (addr => address, Addr => Address, ADDR => ADDRESS).: matches the capitalization of the Word you typed in the substituted text.
- Order Actions in Pick Lists based on usage.: puts the Actions you run most at the top of a Pick List.
- Play sound when expanding text.: plays a short confirmation sound each time a substitution completes.
See Backing Up Your ActiveWords Data and Play Sound When Expanding Text.
Shared ActiveWords
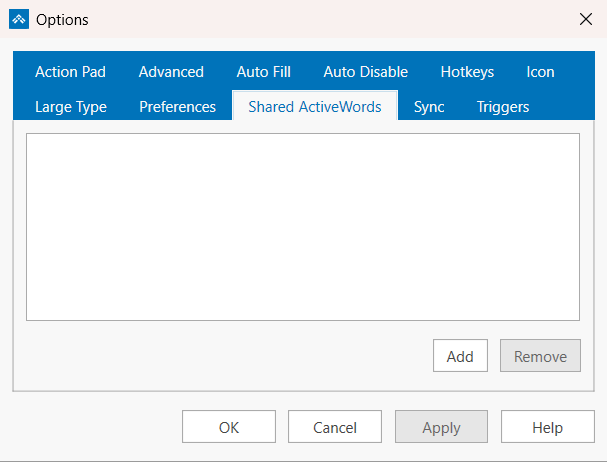
Lists the shared ActiveWords databases you have subscribed to, with Add and Remove buttons. The list is empty until you add one. A shared database lets a team use the same Words and Actions from one file.
See Shared ActiveWords.
Sync
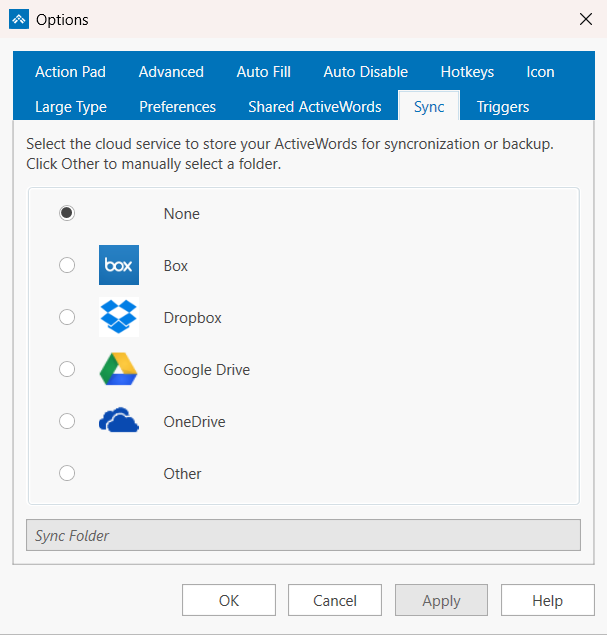
Choose the cloud service that stores your ActiveWords data for syncing or backup: None, Box, Dropbox, Google Drive, OneDrive, or Other. ActiveWords finds the folder for the named services on its own. Choose Other to type or browse to a Sync Folder yourself.
See ActiveWords Sync, OneDrive setup, Citrix ShareFile setup, and Reset ActiveWords Sync.
Triggers
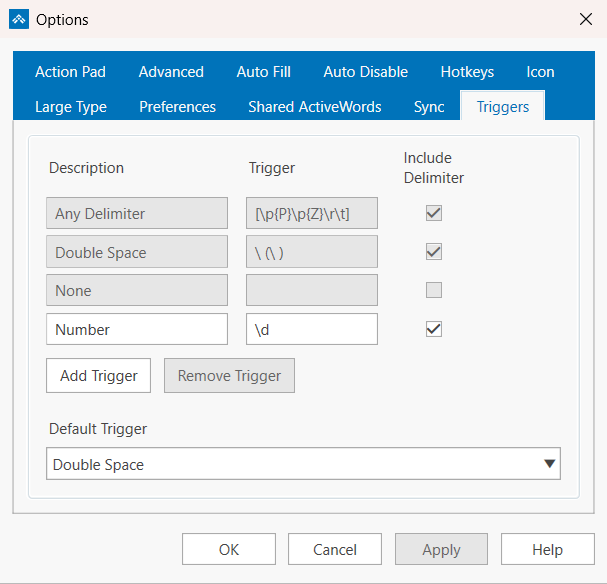
Lists every Trigger with its Description, its Trigger pattern, and an Include Delimiter checkbox. The three built-in Triggers cannot be edited or removed:
- Any Delimiter, pattern
[\p{P}\p{Z}\r\t] - Double Space, pattern
\ (\ ) - None, which has no pattern because it only triggers from the Action Pad or the ActiveWords Key
Use Add Trigger and Remove Trigger for your own custom Triggers, and Default Trigger to pick the Trigger that new Words start with.
See Triggers for the full explanation, including custom Trigger patterns.
ActiveWords monitors visible text input in the Text Monitor, but automatically stops monitoring when the cursor is in a password field.

Password Field Protection
When ActiveWords identifies a password field, it turns off the Text Monitor and prevents ActiveWords substitutions from using the Windows Clipboard. This helps avoid displaying passwords as you type.
This feature is automatically enabled for Windows programs and popular browsers on supported Windows versions. It can be turned off in the Advanced Options tab if you want passwords to appear in the Text Monitor as they are typed.
See It In Action
Note: ActiveWords relies on documented methods for password field identification.
ActiveWords can play a short confirmation sound each time it substitutes text, so you know an Action fired without looking away from what you are typing. It is a single checkbox on the Preferences tab in Options, labelled Play sound when expanding text.
Turn The Sound On Or Off
- Right-click the ActiveWords floating icon or the ActiveWords icon in the system tray, then choose Options.
- Open the Preferences tab.
- Check Play sound when expanding text. to hear the sound, or clear the checkbox to keep substitutions silent.
- Click OK to save and close, or Apply to save and stay in Options.
What You Hear
- One short sound, about a tenth of a second, each time a substitution completes.
- ActiveWords plays its own sound file,
ActiveWords.wav, installed with the program inC:\Program Files\ActiveWords 5\Sounds\. - It is not a Windows system sound, so it does not appear in Change System Sounds and cannot be swapped there. Your Windows volume and output device still control how loud it is.
Note: If you do not hear anything, first confirm the checkbox is checked, then check your Windows volume and output device. If your PC is muted, ActiveWords cannot play the sound.
Not The Same As The Windows Default Beep
Windows plays its own Default Beep when you type somewhere that does not accept text, such as the Windows Desktop. That sound comes from Windows, not from ActiveWords, and clearing Play sound when expanding text will not stop it. Turn it off in Windows sound settings instead.
Related FAQs
- Options – The Preferences tab and every other Options tab
- Turn Off the Windows Default Sound – Silence the Windows beep you hear when typing where there is no cursor
- Adding Words and Actions – Create the Words that trigger substitutions
You can print the ActiveWords List View to use as a quick reference for your Words and Actions.
See It In Action
ActiveWords helps you save time, reduce repetitive typing, and improve the quality of your work. The Productivity dialog estimates the value of the time you save when you trigger Actions.
Open Productivity
Right-click the ActiveWords icon and choose Productivity.
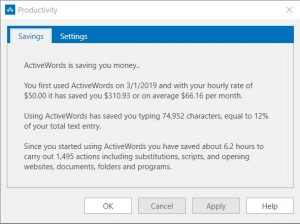
How Savings Are Estimated
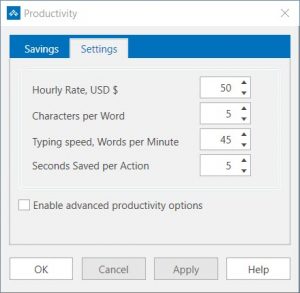
ActiveWords measures keystrokes saved by triggering Substitute Text, Substitute Content, and Script Actions. You set the variables used for the estimate, including typing speed, characters per word, the value of your time, and the estimated time saved each time you trigger an Action.
ActiveWords uses those settings to calculate an estimated value for the time you save.
Productivity Settings
The Productivity dialog shows how much you are using ActiveWords and estimates the time-saving benefits. These measurements are estimates. Actual time savings cannot be perfectly measured because there are many unknowns, such as how you might otherwise complete the same task.
Personalizing the variables in Productivity Settings can give you a practical estimate of the value ActiveWords provides for your work.
Action Counts and Advanced Options
ActiveWords counts how often you use Words to navigate or run Actions, such as opening a file, folder, program, or web page. You can set the average number of seconds saved each time a Word triggers these Actions.
By default, each Action type except Substitute Text uses the same Seconds Saved per Action value. Turning on Enable advanced productivity options lets you customize the estimated seconds saved by Action type.
Auto-Corrections
Auto-corrections, such as beleive=believe, are Substitute Text Actions. In most auto-corrections, the number of characters substituted is similar to the number of characters typed, so the direct keystroke savings may be small.
The real benefit is the time you do not spend correcting misspellings, plus the improved quality of your work. Universal auto-correct helps reduce misspelled words in materials you share with customers, colleagues, and others.
Review Usage by Action
You can review how many times each Action has been triggered by viewing the Usage column in the List View.
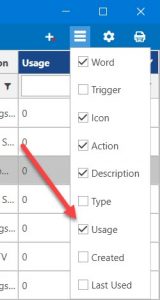
It is highly unlikely that your ActiveWords data will become unusable, but abrupt power interruptions and system crashes can result in database problems.
If you need to recover your data file, restore from an ActiveWords data backup.
Restore an ActiveWords Backup
- Turn on Advanced Options by checking Show advanced tools and options in the Preferences tab of the Options dialog.
- Right-click the ActiveWords icon and select Advanced → Restore.
- The file browser opens to the ActiveWords data backup folder.
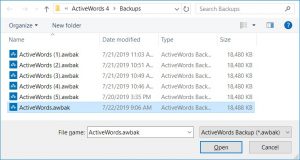
- Select the most recent data backup file and press Enter.
- Click OK on the Restore ActiveWords Backup dialog.
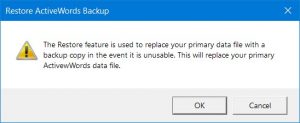
If ActiveWords Sync is not synchronizing correctly, first confirm that every ActiveWords installation is running the same build. You can check the build number from About on the ActiveWords icon right-click menu.
Reset Sync on Each Computer
- Open Options on each ActiveWords installation.
- Select the Sync tab.
- Set Sync to None on every installation.
- Set Sync back to the desired cloud service on each installation, one computer at a time.
This re-establishes the database file in the ActiveWords Sync folder on each PC.
Basic product support for scripting includes the documentation offered here.
Copy and paste the bold indented text below into a new Script Action, associate your Word. Trigger your Word to watch it work. Some examples have download links to insert directly in your ActiveWords database. In these cases the file name is the Word to trigger. Change the Word to something you are comfortable with if needed. BE CERTAIN to use straight ("), not curly ("), quotes in scripts.
Script examples below include comments to explain what the syntax does
Search all ActiveWords fields
Download: saw.awdb
{word show}${input "Search ActiveWords for:","Search ActiveWords"}
Note the ability to add comments using lines beginning with a semicolon. The script above could also be:
; Open the ActiveWords List View. The Word "show" triggers the Action "activewords://show" included in the default ActiveWords installation. This Word/Action association must exist for this script to work.
{word show}
; Input the text string to search for.
${input "Search ActiveWords for:","Search ActiveWords"}
Search ActiveWords data for text in the Word field
Download: fw.awdb
{word show}{down}${input "Search Words for:","Search ActiveWords for Words"}
Note: This script assumes the List View filter is checked (see the Gear icon on the List View) so that each field can be searched individually.
; Open the ActiveWords List View. The Word "show" triggers the Action "activewords://show" included in the default ActiveWords installation. This Word/Action association must exist for this script to work.
{word show}
; Press the Down Arrow once to place the active cursor in the Word Search field.
{down}
; Input the text string to search for.
${input "Search Words for:","Search ActiveWords for Words"}
Search ActiveWords data for text in the Action field
Download: fa.awdb
{word show}{down}{tab 3}${input "Search Actions for:","Search ActiveWords for Actions"}
Note: This script assumes the List View filter is checked (see the Gear icon on the List View) so that each field can be searched individually.
; Open the ActiveWords List View. The Word "show" triggers the Action "activewords://show" included in the default ActiveWords installation. This Word/Action association must exist for this script to work.
{word show}
; Press the Down Arrow key once to place the active cursor in the Word Search field.
{down}
; Press the Tab key three times to place the active cursor in the Action Search field.
; Input the text string to search for.
${input "Search Actions for:","Search ActiveWords for Actions"}
Search the Windows StartMenu
Download: swin.awdb
{windows down}{windows up}${input "Search Windows for:","Search Windows"}
; Open Windows Start Menu.
{windows down}{windows up}
; Accept user input, object of the Windows Start Menu search.
${input "Search Windows for:","Search Windows"}
Open a new window in Wordpad, enter some text, close the document.
{word wordpad}{wait}{winactivate "Document - Wordpad"}This is a test.{winclose}
; This script includes {wait} so assure the new Wordpad instance receives the included text. If {wait} is not included another open instance of Wordpad with the same Title would receive the included text. Here, {wait} allows enough time for Wordpad to create its first window. {winactivate} then makes that window the active focus for input.
; {winclose} closes the specified window. If there were subsequent commands in this script that were dependent on the window closing you would use {winwaitclose} with a generous timeout (e.g., 10000) to allow time for the user to address any prompt to save the window.
Save an Office 365 File in a Specific Folder
{alt down}fao{alt up}[path to specific folder]{enter}
Complex script to search Outlook Calendars
Download: fcf.awdb
{run "outlook.exe"," /recycle /select outlook:calendar"}{wait 1000}{f3}{ctrl down}{alt down}a{ctrl up}{alt up}${input "Search Outlook Calendar:","Search Outlook Calendar"}{wait 1000}{enter 2}
; Outlook search scripts require Outlook.exe to be running.
; Scripts involving Outlook may not be reliable as a result of vulnerabilities in response times dependent on the included {wait} commands. If an Outlook script fails, consider extending the {wait} times beyond the default 500 milliseconds. For example, try changing {wait 1000} to {wait 1500}.
; This command opens the Outlook Calendar Folder.
{run "outlook.exe"," /recycle /select outlook:calendar"}
{wait 1000}
; Put focus in the "Search" field.
{f3}
; Set search to All Calendar Items
{ctrl down}{alt down}a{ctrl up}{alt up}
${input "Search Outlook Calendar:","Search Outlook Calendar"}
{wait 1000}{enter 2}
Create Input Script
Note that you can trigger this Action inside the Action field on a new Action. Also note how to include a curly bracket as text. Download: input.awdb
${{}input "${input "Enter Input Prompt","Enter Prompt"}","${input "Enter Titlev,"Title"}"{}}
Check Word Document
{alt}rc1
; Activate "Review" tab of ribbon.
{alt}r
; Simulate pressing "c" then "1" to select "Check Document" control.
c1
Open currently active URL in Google Chrome browser
Download: oic.awdb
{alt down}{d}{alt up}{clipcopy}{win down}r{win up}{wait}chrome.exe {clippaste}{enter}
; With the page active in the current browser, simulate Alt-d to select the contents of the Address field.
{alt down}{d}{alt up}
; Copy the selected content in the Address field and wait for it to be ready to paste.
{clipcopy}
; Open the Windows Run Command.
{win down}r{win up}
; Enter "chrome.exe " then {clippaste} to complete the Windows Run Command line.
chrome.exe {clippaste}
; Simulate pressing the Enter key to open the URL in Chrome.
{enter}
Open currently active URL in Edge browser
Download: oie.awdb
{alt down}{d}{alt up}{clipcopy}{win down}r{win up}{wait}microsoft-edge:{clippaste}{enter}
; With the page active in the current browser, simulate Alt-d to select the contents of the Address field.
{alt down}{d}{alt up}
; Copy the selected content in the Address field.
{clipcopy}
; Open the Windows Run Command.
{win down}r{win up}
; Enter "Microsoft-Edge:" then {clippaste} to complete the Windows Run Command line.
Microsoft-Edge:{clippaste}
; Simulate pressing the Enter key to open the URL in Chrome.
{enter}
Example of Script Using Modifier Keys.
SnagIt allows the user to assign shortcut keys to individual "Presets." Assume the shortcut "Ctrl-Shift-i" is assigned to start an Image capture. The script is:
{control down}{shift down}{i}{shift up}{control up}
Create a new Note in Evernote and put the focus in the Title field
Download: nnote.awdb
This script requires that Evernote "Tools>Options>Shortcut Keys>Create a New Note" is set to its default value; Ctrl-Alt-n. It also requires Evernote to be running.
{control down}{alt down}{n}{alt up}{control up}{winactivate Evernote,,5000}{wait 500}{f2}
Search the current Evernote Notebook Using an Input
Download: sen.awdb
This script requires that Evernote "Tools>Options>Shortcut Keys>Find in Evernote" is set to its default value; Win-Shift-f. It also requires Evernote to be running.
{windows down}{shift down}{f}{shift up}{windows up}{winactivate Evernote}${input "Search Current Notebook:","Search Evernote"}
Note: Scripting is for advanced users and enterprise administrators. Scripting can be used to automate multi-step processes, such as directly delivering the result of an Outlook Inbox search (enter search text in input dialog, open Outlook, go to Inbox, place focus in Search field, input search text).
Several script examples can be found here. Scripting is not a replacement for advanced scripting tools such as Visual Basic, AutoIT, or AutoHotKey. Words can be used to trigger script files created with other scripting tools for more advanced automation.
Script commands to simulate non alpha-numeric keys Script commands to trigger behavior Script commands to manage windows Script examples
Syntax Notes:
- Create scripts using the "Script" Type from the New Action tool.
- Commands are defined within braces {}, as in {control}.
- To repeat a command key include a space and the number of repeats, as in {backspace 5}.
- Use parentheses to hold down and release keys. For example, {control}({shift}{f1}) simulates pressing and holding the Control key, then pressing the Shift key, then pressing the F1 key, then releasing the Control key. Likewise, {alt}({numpad2}{numpad6}{numpad5}) simulates pressing and holding the Alt key, then pressing 2, 6, and 5 on then numeric keypad, then releasing the Alt key.
- To send a brace, enclose the brace in a pair of braces. So, to send an opening or closing brace, use {{} or {}}.
- Commands are not case sensitive.
- Comments are included in scripts by starting a line with a semi-colon.
- Regular characters are sent as Unicode so in most cases shift+character will NOT give you the upper case of the character. Shift is only useful in combination with other modifier keys.
Script commands to simulate non alpha-numeric keys:
Modifier Keys:
CONTROL or CTRL SHIFT ALT WINDOWS or WIN Modifier Key Syntax:
- {[modifier down]}[keys modified]{[modifier up]} – e.g. – {control down}{k}{control up}
Use this syntax where the modify key needs to be held down at the same time as the keys being modified. The keys being modified may be in braces {} or not depending on the program where the script is used. So, {control down}{k}{control up} may work and/or {control down}k{control up} may work.
- {[modifier]} – e.g. – {alt}jscf
Use this syntax where the modifier key needs to be pressed and released before entering the keys being modified, "{alt}jscf" simulates pressing and releasing the Alt key, then pressing j,s,c, and f one key at a time. This syntax applies to ribbon menus in Office programs, for example.
Other non alpha-numeric keys:
LEFTWIN or WINDOWS RIGHTWIN ENTER TAB ESC or ESCAPE HOME END LEFT RIGHT UP DOWN PGUP PGDWN NUMLOCK SCROLLLOCK SPACE (or just use a space) PRTSC BREAK BACKSPACE or BKSP or BS CLEAR CAPSLOCK INSERT or INS DELETE or DEL HELP F1 through F16 MULTIPLY (* key from main keyboard) ADD (+ key from main keyboard)
SUBTRACT (- key from main keyboard) DIVIDE (/ key from main keyboard) * (key from numeric keypad) + (key from numeric keypad) – (key from numeric keypad) / (key from numeric keypad) NUMPAD# where # is the number on the numeric keypad.
Script commands to trigger behavior.
INPUT – ${INPUT "[entry field text]","[dialog title text]"} – User text entry within a script sequence. Notes on ${input}: ${input} can be used in any Action Type. For example, a URL Action:
http://www.bing.com/search?q=${input "Search the Internet:","Bing Internet Search"}
You can embed ${input} commands inside other commands. For example,
{word ${input "Enter Word to trigger:","Enter Word to Trigger"}}
Requires use of ASCII quotation marks (no curly quotes). No spaces on either side of the comma separating [entry field text] and [dialog title text]. So, "[entry field text]","[dialog title text]" will work but "[entry field text]", "[dialog title text]" will not work. You can trigger text substitution Actions within input fields but not other Action Type. You can trigger text substitution Actions that contain input commands within input fields.
SHOWMESSAGE – ${showmessage "title", "message"} – Use this to pop up a message for the user during a script operation.
BLOCKINPUT {blockinput [on/off]} - This command allows scripts to block user keyboard and mouse input during script operation. If {blockinput on} is included without {blockinput off} keyboard and mouse input will stop being blocked upon completion of script execution.
CONTEXTMENU – {contextmenu} Windows mouse right-click menu.
RUN – Run a program with or without parameters. {run "[program]","[parameters]"}. Example: {run "outlook.exe"," /c ipm.note"}
CONTROL 2 – {control 2} - ActiveWords command – Toggles the Text Monitor on and off.
EDITLASTACTION – {editlasstaction} – ActiveWords command – Will edit the last triggered Action. This is useful to quickly edit or delete an Action or any associated Words without having to open the list view and filter to locate the Action.
TRIGGERLASTWORD {triggerlastword} – ActiveWords command – Will trigger the Action associated with the last Word triggered. This is useful to repeat an Action. It can be used one time.
WAIT – {wait #####} – Default is a half second delay, 500 millisecond, i.e. {wait 1000} will delay script processing for one second.
WINSAVE and WINRESTORE – {winsave} and {winrestore} - These commands allow you to store a window context within a script, then return to that context later in the script.
WORD – {word [word]} – Triggers the Action associated with [word], e.g., {word cnn} triggers the Action associated with the Word "cnn."
Note: If you have the same word associated with more than one action, one triggering with a single delimiter and to the other with a double space, the script will trigger the Action associated with the Word that triggers with a single delimiter.
SETKEYDELAY – {SetKeyDelay n} – Set the delay used between key strokes. This timing will remain for the duration of the script unless changed by another SETKEYDELAY command. This command can be useful to slow down scripted keyboard entry.
CLIPCOPY – {clipcopy} – Empties clipboard, sends Control-c, and waits for copied contents to be present in the clipboard. Uses both CLIPEMPTY and CLIPWAIT.
CLIPEMPTY – {clipempty} – empty clipboard. Use before {control}{c} then use {ClipWait}.
CLIPWAIT – {clipwait nnn} wait for clipboard to contain data.
CLIPPASTE – {clippaste} – Pastes clipboard contents then waits for paste to be complete. This is important in scripts that copy to the clipboard, paste the clipboard, then include additional commands.
ACTIONTEXT {actiontext} – Will operate on selected text when the ActiveWords Key is pressed and will act on text entered in the ActionPad. For example, the Open URL Action "http://www.google.com/search?q={actiontext}" will search Google for any selected text and for any text entered in the ActionPad that is not a Word.
Note: It is best not to associate Words with Actions including {actiontext}. A prompt will appear allowing selection of a specific Action if more than one Action includes the {actiontext} command.
These commands work when a browser window is the active context:
BROWSERBACK BROWSERFORWARD BROWSERREFRESH BROWSERSTOP BROWSERSEARCH BROWSERFAVORITES BROWSERHOME These commands control media regardless of active context:
VOLUMEMUTE VOLUMEDOWN VOLUMEUP MEDIANEXTTRACK
MEDIAPREVTRACK MEDIASTOP MEDIAPLAYPAUSE
Script commands to manage windows (WIN* Commands)
The Windows operating system tracks each open window, and when a window opens and closes. The following commands help manage windows being operated on by a script.
Note: Script commands waiting for Universal App windows (for example, EDGE) must rely on the general WAIT command rather than WIN* commands as Universal Apps may not provide a reliable means to assure a window is ready for input.
WINWAIT – {WinWait title, class, timeout, process} – Waits for a specific window to exist, may not be in the foreground. This commands assures a previously opened window exists before processing subsequent commands.
WINWAITIDLE – {WinWaitIdle title, class, timeout, process} – Waits for a specified window to be ready for user input (keyboard, mouse or touch) regardless of whether the specified windows has focus. Reliability is dependent on the application. Use WINWAITIDLE, for example, to wait for a user to activate the specified window before executing subsequent commands.
WINACTIVATE – {WinActivate title, class, timeout, process} – Waits for a specific window to exist and brings it to the foreground (makes it the active context). Makes the specified window the focus for keyboard input.
WINCLOSE – {WinClose title, class, timeout, process} – Closes the specified window regardless of whether that window is in focus.
WINWAITCLOSE – {WinWaitClose title, class, timeout, process} – Example: Script closes a window that requires a decision (save or not).
WINWAITCLOSE would be used to pause the script until the user acts or the timeout occurs cancelling the script.
SETWINTIMEOUT – {SetWinTimeout 1000} – Sets the Timeout to apply to all subsequent WIN* commands having a Timeout modifier. If a timeout occurs the script will abort.
WIN* Commands, Information
WIN* Command Optional Specifiers
- Title = full text or substring of window title (quotes ok). It is best to use a string of title text that is unlikely to exist in any other open window. If it is possible multiple windows with the same title string are open in different programs, use the "process" variable to define the process required for the specified window.
- Class = window class (quotes ok).
- Timeout = The remainder of the script will be aborted if the timeout completes. The default timeout is 500 milliseconds. Value is in milliseconds, so 10000 is ten seconds. It is useful to allow for a long timeout period when the script might be opening an executable for the first time. The next command in the sequence will occur immediately after the Win* command is true, so the timeout should be sufficient for a specified window to open, for example, when a script opens a program or file.
- Process = Name of the Windows Process related to the windows being operated on, for example, winword.exe.
Advanced users can use a tool such as Spyxx to identify the above window parameters. Any optional specifier that includes a space needs to be within quotes, for example, a document title such as {winwait "Document – Wordpad"}. This also applies to regex syntax such as {winwait ".*wordpad"} for any window with wordpad at the end of its title. The WIN* commands use Unicode Regex expressions. For example, if the window title is "Untitled – Notepad," then "Un.*Notepad" will match it. Learn more about regex syntax.
If Title, Class, and Process are not specified, the last window found from the preceding commands will be used. Win* commands remember the last window found, so there is no need to re-specify the Title or Class when a prior command already specifies the window to operate on.
The syntax requires a space after the WIN* command and a comma between each variable being used. For example: {winwait,,5000}, {winwait,,,winword.exe}, {winwait "Document – Wordpad"}, {winwait [title],[class],[timeout],[process]}, {winwait letterhead,NetUIHWND,5000,winword.exe}, or {winwait letterhead,,5000,winword.exe}.
For example, {winwait letterhead,,5000,winword.exe} waits up to 5 seconds for a window containing "letterhead" in the title and with the process "winword.exe" to exist. If the specified window is found within the timeout period, the next command in the script executes. Otherwise, the script stops processing at that point.
Selected Text (formerly called ActionText in Version 4) acts on any text you select anywhere on your computer and on any text entered in the ActionPad. Selected Text serves as your entry point for services and information, providing instant access to searches, translations, and custom actions—much like the Windows Key, only more powerful.
How to Use Selected Text
- Select any text from any application (web browser, document, email, etc.)
- Press F9 (the default hotkey for Selected Text actions)
- Choose from the menu of available actions, or if you only have one Selected Text action, it will execute immediately
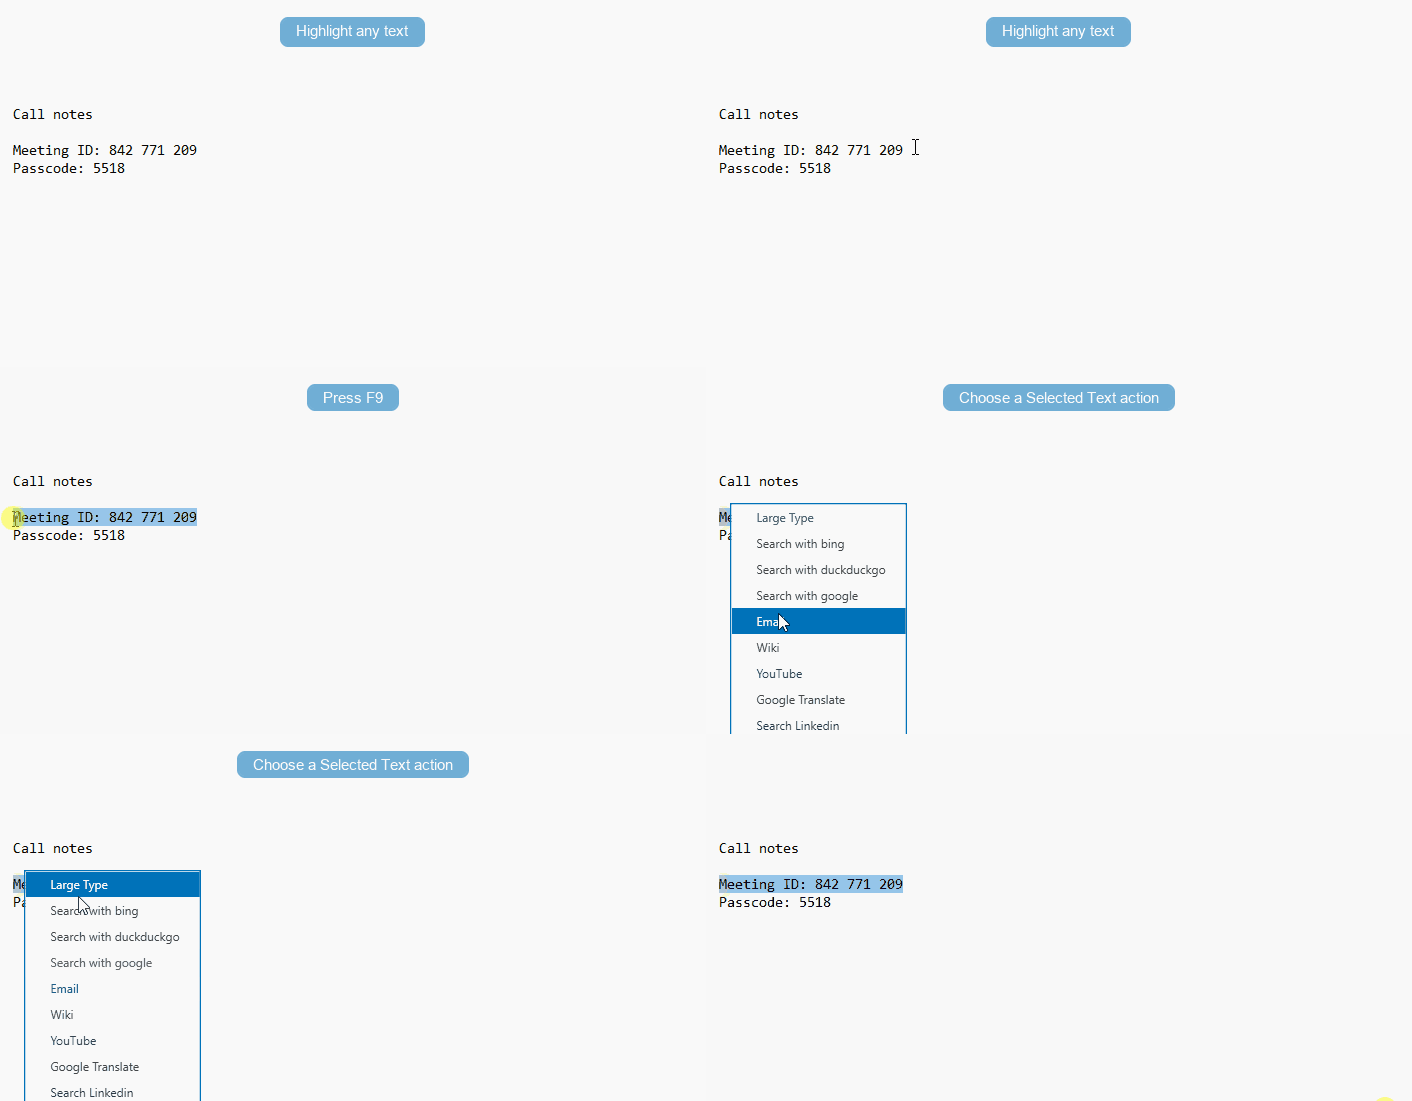
Built-in Selected Text Actions
Your default ActiveWords 5 installation includes several Selected Text actions:
- Bing Search - Search selected text on Bing
- DuckDuckGo Search - Search selected text on DuckDuckGo
- Google Search - Search selected text on Google
- Email - Create a new email using the selected text
- Wikipedia - Look up the selected text on Wikipedia
- YouTube - Search for videos related to the selected text on YouTube
- Google Translate - Translate selected text
- LinkedIn Search - Search for selected text on LinkedIn
- Large Type - Display selected text in a large, easy-to-read format (great for presentations or when you need text to be highly visible)
You can delete or add Selected Text actions to meet your needs. If you only have one Selected Text resource, the action will execute instantly without showing a menu.
Customizing the Hotkey
While F9 is the default hotkey for Selected Text actions, you can customize hotkeys for any action:
- Open the List View in ActiveWords
- Find the action you want to customize
- Right-click on the action and set your preferred hotkey in the popup
- You can even assign the same hotkey to multiple actions—ActiveWords will show a Pick List to choose from
Creating Your Own Selected Text Actions
You can create custom Selected Text actions to work with the text you have highlighted or entered through the Action Pad. These actions use the {SelectedText} command to insert that text into the action when it runs.
How {SelectedText} Works
The {SelectedText} command represents any text you are acting on. When an action runs, it uses either highlighted text or text provided through the Action Pad, depending on context.
This allows the same action to work in multiple situations without modification.
Example: Creating a Wikipedia Search Action
To create a Wikipedia search action:
- Action Type: Open URL
- URL:
https://en.wikipedia.org/wiki/Special:Search?search={SelectedText} - Assign a hotkey or use the default F9 hotkey.
When you run this action, the selected text is passed directly into Wikipedia's search.
Using {SelectedText} in Multiple Actions
The {SelectedText} command can be used in any lookup-style action, such as web searches, translations, or other external tools.
When multiple actions use the same hotkey, ActiveWords displays a Pick List. This lets you choose where to send the selected text, for example to Wikipedia, Bing, or another lookup source.
Beyond Simple Searches
Selected Text actions are not limited to public search engines. They can also be configured to interact with enterprise databases, internal tools, or custom web services, making them a powerful way to connect ActiveWords with your existing systems.
Using Selected Text with ActionPad
Selected Text also works with the ActionPad. In V5, Selected Text options appear within the ActionPad search results. For example, if you type or search for a term in the ActionPad, the system can present Selected Text actions (like Google Translate) as clickable options.
Workflow:
- Open the ActionPad (default: Ctrl+Space)
- Type or paste any text you want to act on
- Press Enter
- Select the information source or action you want from the results (which may include ActiveWords, folders, applications, and Selected Text actions)
- The action executes instantly with your text
Multiple Actions and Pick Lists
If you have multiple Selected Text actions assigned to the same hotkey (like F9), ActiveWords will display a Pick List showing all available options. Simply select the action you want to use.
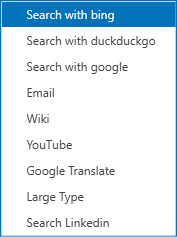
Tips
- If you only have one Selected Text action, it will execute immediately without showing a menu
- Selected Text actions can access enterprise databases and custom web services
- You can use the
{SelectedText}command in any action type that supports text substitution - If the text you select is a known ActiveWord, the associated action for that Word will be carried out instead
Shared ActiveWords let a central administrator distribute and control a common set of Words and Actions for users on a Windows network. This is useful when a group needs consistent language, approved text, shared commands, or centrally managed Actions.
How Shared ActiveWords Work
When an ActiveWords file (*.awdb) is assigned as Shared, its data is inserted into each user's ActiveWords data file for normal use. Users can trigger Shared ActiveWords from the main ActiveWords interface, but they cannot edit or delete the shared records from their local user interface.
ActiveWords periodically checks whether the assigned Shared ActiveWords file has been updated. When an update is detected, the previous shared data is removed from the user's data file and the updated shared data is inserted.
Shared ActiveWords files can be stored at any network location accessible by each ActiveWords user.
Creating an ActiveWords File to Share
An administrator creates an ActiveWords file containing the Words and Actions to be shared, then exports that file from the ActiveWords client.
- Create the Words and Actions to be shared.
- Give each Action a useful Description that identifies the shared relationship.
- Assign the same Tag to the Actions you want to export together.
- Right-click the Tag and select Export.
- Name and save the resulting
*.awdbfile at the desired network location.
The network folder and *.awdb file must have read/write access for the ActiveWords users on the network and must be simultaneously accessible by the number of users running ActiveWords.
Create Shared ActiveWords video: Watch the video.
Assigning a Shared ActiveWords File
After the shared file is saved on the network, assign its location to each client. You can do this manually in the Shared ActiveWords settings, by sending users a URL link, or by running a command line file containing the path to the shared file.
Assigning with URL Links or Command Files
Use these URL formats to add or remove Shared ActiveWords assignments:
- Add:
activewords:shared?file=[path to file] - Remove:
activewords:shared?remove=[path to file]
Note: The network path to a Shared ActiveWords file must use a mapped drive, such as Z:\Folder\File, not a UNC path such as \\SERVER\Folder\File.
For command files, use the ActiveWords executable followed by the shared file URL. For example:
C:\Program Files (x86)\ActiveWords 5\ActiveWords.exe "activewords:shared?silent=yes&file=Z:\Folder\File.awdb"
The silent=yes&file= syntax can be used in links and command files to suppress the confirmation dialog. Administrators can run *.cmd files for multiple ActiveWords installations using network management tools. Create command files in a plain text editor such as Notepad and save them with the .cmd suffix.
Assigning in the Settings Dialog
- Right-click the floating icon or system tray icon and select Options.
- Open the Shared ActiveWords tab.
- Click Add, then navigate to and open the ActiveWords file to be shared.
- Click Apply, then exit Options.
The contents of the Shared ActiveWords file are inserted into the user's ActiveWords data file and become available immediately.
Assign Shared ActiveWords video: Watch the video.
Editing a Shared ActiveWords File
For easier editing, assign the same Tag to all Actions used in a Shared ActiveWords file. Exporting that Tag creates a *.awdb file containing the Tag and its related Words and Actions.
Editing Shared ActiveWords files requires Advanced Options. Turn on Advanced Options by checking Show advanced tools and options in the Preferences tab of the Options dialog.
- Right-click the floating icon and select Advanced → Exit external database.
- Use the file browser to locate and select the active Shared ActiveWords file on the network.
- The selected Shared ActiveWords file loads as the active database, and the administrator's personal data file is closed.
- Click Activate on the ActiveWords License dialog and select a valid license file.
- Edit the shared Words and Actions as needed.
- Right-click the floating icon and select Exit when finished editing.
- When prompted, save your changes and deactivate the license applied to the Shared ActiveWords file.
When you exit, the existing Shared ActiveWords file is overwritten at its network location. ActiveWords clients assigned to that file automatically receive the updated shared data. The administrator's personal ActiveWords data file is loaded again when ActiveWords starts on the administrator's machine.
Edit Shared ActiveWords video: Watch the video.
Other Attributes of Shared ActiveWords
- Shared ActiveWords assignments are automatically removed from local ActiveWords installations if the file or path no longer exists.
- If the network path is temporarily unavailable, Shared ActiveWords remain in the user's data file so the user can continue working.
- If a Shared ActiveWords file contains an Action identical to one in the user's personal ActiveWords file, it is included as a duplicate Action.
- Multiple Shared ActiveWords files can be assigned.
- Shared ActiveWords files must have read/write security permissions and be accessible by the users assigned to them.
- Shared ActiveWords in the user data file are ignored by ActiveWords Sync.
Some Windows Universal Apps, including apps such as Mail and Calendar, use a different application model than traditional Windows desktop programs. That difference can make substitution delivery less predictable.
Clipboard Behavior
In some Universal App contexts, a substitution may not appear unless the Windows Clipboard already contains something. Copying or cutting any text before triggering the substitution can sometimes resolve the issue.
Ongoing Compatibility Work
ActiveWords continues to explore ways to improve the reliability of both text and content substitutions in Universal App contexts.
ActiveWords 5 is supported on current Windows desktop systems and Windows Server 2019.
Supported Windows Versions
- Windows 11
- Windows 10 build 1607 and later
- Windows Server 2019
Note: Windows 7 is no longer supported by Microsoft and is not maintained as a supported ActiveWords 5 platform. ActiveWords 5 has been reported to install and run on Windows Server 2016, but it is not a fully supported platform and has known limitations, including screen scaling greater than 100%.
Tags help you organize, filter, and quickly find your Words and Actions. In ActiveWords 5, tags are accessed through a tag icon in the main window instead of a side column.
Where to Find Tags (Version 5)
Click the tag icon in the main window to open the tags view. The icon shows your tags and lets you work with them in one place. When the tags view is closed, all Actions are displayed in the main list.
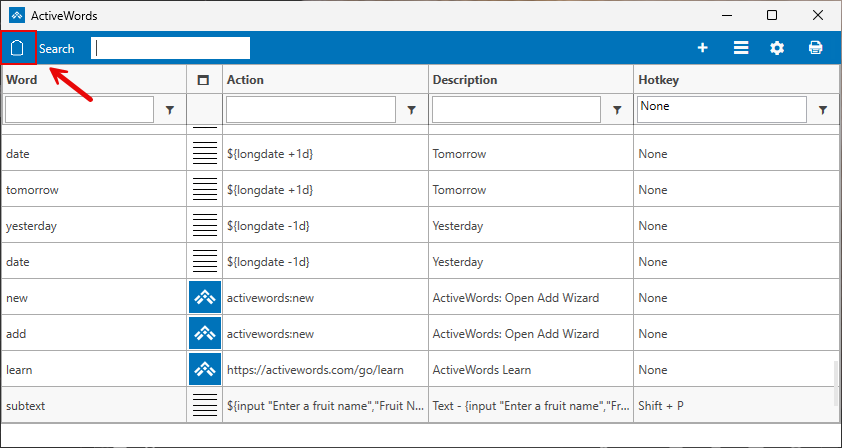
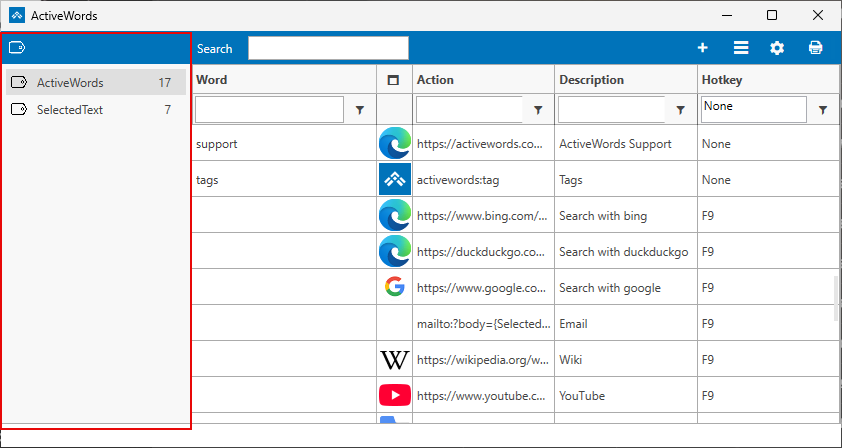
What You Can Do with Tags
- View and filter – Select a tag to see only the Actions associated with that tag in the list.
- Create tags – Right-click selected Actions in the list and choose "Tag" from the context menu, or assign a tag when adding or editing an Action.
- Rename and delete tags – Right-click a tag to rename or delete it as needed.
- Group and organize – Use tags to group related Actions (e.g., by project, client, or topic) so you can find and trigger them quickly.
Importing and Tags
When you import a file (e.g., a Shared ActiveWords file or Addin), ActiveWords can present a list of the imported Actions and let you assign or apply tags to them. This makes it easy to keep imported content organized and to filter it later.
Triggering a Tag
Tags can be triggered like Words. Trigger a tag with a double space or the ActiveWords Key to see a list of all Actions associated with that tag, then choose one to run. You can associate an Action with multiple tags.
Addins and Shared ActiveWords
ActiveWords Addins and Shared ActiveWords files often assign a tag to each included Action so you can easily find, reference, and edit them. When exporting or sharing, grouping Actions under one tag can simplify creating and managing the shared file.
Related FAQs
- List View – Create and edit actions
- Shared ActiveWords – Export and share Words and Actions
- ActiveWords Sync – Sync data across devices
Windows can be configured to block installation of apps from outside the Microsoft Store. If that setting is enabled, Windows may show a message saying the app you are trying to install is not a Microsoft-verified app.
Allow Apps From Anywhere
To install ActiveWords, allow Windows to install apps from outside the Microsoft Store.
Windows 10
- Open the Settings app.
- Open Apps settings and select Apps and Features.
- Under Choose where to get apps, select Anywhere.
Windows 11
- Open the Settings app.
- Select Apps.
- Open Advanced app settings.
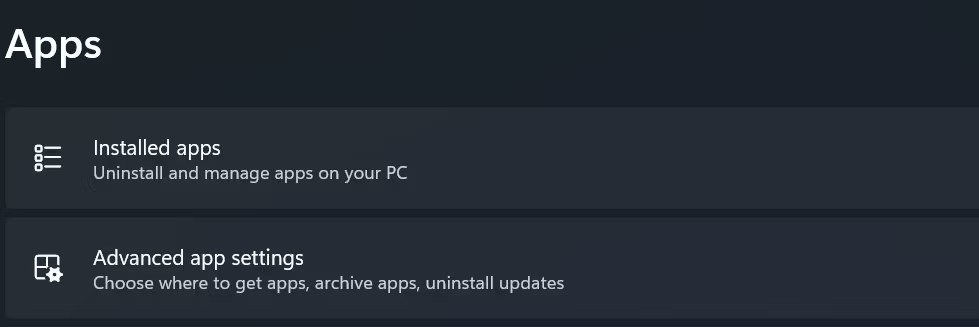
- Next to Choose where to get apps, select Anywhere.
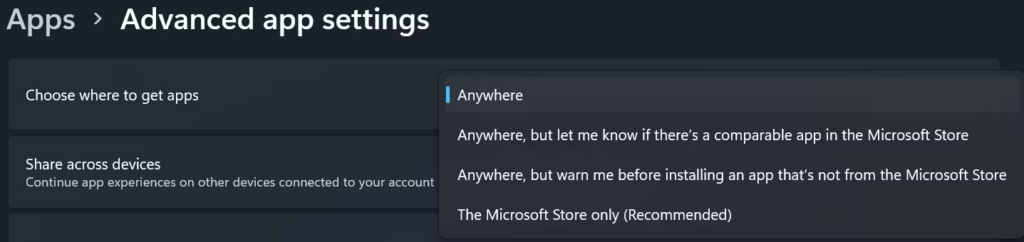
Triggers tell ActiveWords when to carry out the Action associated with a Word. A Trigger can be something simple, such as two spaces after a Word, or something more specific, such as a period, a number, or another custom pattern.
Most people can use the standard Trigger choices. Custom Triggers are available when you want more control over exactly what finishes a Word and whether the typed trigger should remain in the result.
Standard Trigger Choices
- Any Delimiter: Trigger the Word when it is followed by a delimiter such as a space, comma, period, or other delimiter.
- Double Space: Trigger the Word when it is followed by two spaces.
- None: Trigger only from the ActionPad or with the ActiveWords Key.
Note: At ActiveWords, a delimiter is a sequence of one or more characters or keys that triggers the Word and its associated Action.
When To Use Each Standard Trigger
Any Delimiter is useful for corrections and short abbreviations that should expand as soon as you type normal punctuation or spacing. For example, the misspelling beleive can become believe, and k can become contract.
For Substitute Text Actions, the triggering delimiter is included in the output. For example, typing Your new k is effective June 01, 2019 can produce Your new contract is effective June 01, 2019, preserving the space after the k when it expands to become contract.
Double Space is useful for full words and phrases that may also appear as normal text. For example, my name is a phrase you might type in ordinary writing, so a single space would expand it by accident. With Double Space, it expands to your full formal name only when you deliberately type two spaces.
None is useful when you want a Word to run only when you explicitly choose it from ActionPad or press the ActiveWords Key (the default option being F8). This prevents a Word from expanding during normal typing.
Other Ways To Trigger Words
You can also trigger Words using the ActiveWords Key, which is F8 by default, or in the ActionPad by using the Enter key. These triggers are independent of Any Delimiter, Double Space, and None, and apply to all Word/Action associations.
Note: Substitute Text Actions triggered with the ActiveWords Key or from ActionPad do not include a trailing delimiter. Text substitutions created as Script Actions also do not include a trailing delimiter when triggered.
Custom Triggers
Custom Triggers let you add Trigger choices beyond Any Delimiter, Double Space, and None. They are useful when you want a specific key, character, or pattern to trigger a Word.
Find Custom Triggers In Options
- Right click on the ActiveWords floating Monitor icon, or the ActiveWords icon in the system tray.
- Open the ActiveWords Options dialog.
- Select the Triggers tab.
The Triggers tab lists the built-in triggers and any custom triggers you have added.
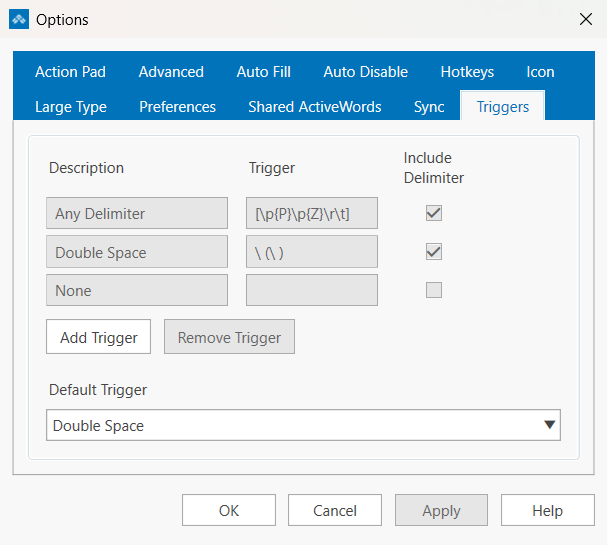
Creating Your Own Trigger
A custom trigger definition can be a single typed character, a set of characters, or a regular expression pattern. Simple triggers are straightforward. More complex patterns use regular expression syntax, so you may need some regex familiarity before creating them.
Note: Triggers built from regular expressions are an advanced option. You can find more information about regex, and test your own patterns, at regex101.com.
- Single-character triggers: A trigger such as
.can make a Word run when you type a period after it. - Character-sequence triggers: A trigger such as
zxfires only when you type the full sequence,zfollowed byx. - Character-set triggers: Put the characters in square brackets to make any one of them a trigger.
[zx]fires on eitherzorx. Any characters can go inside the brackets, including a space or$. - Number triggers: The trigger
\dmakes any numeric key a trigger in any language. - Backslash triggers: To make backslash a trigger, use a double backslash:
\\.
To add one, click Add Trigger on the Triggers tab, then enter a description and the trigger pattern. ActiveWords validates the pattern as you type, and you cannot save an invalid pattern.
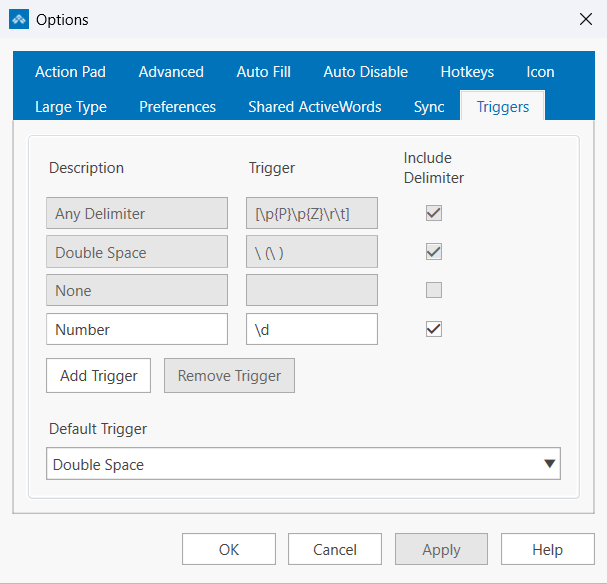
\d makes any numeric key a trigger.Once defined, custom triggers appear in the Trigger menu when you add or edit a Word.
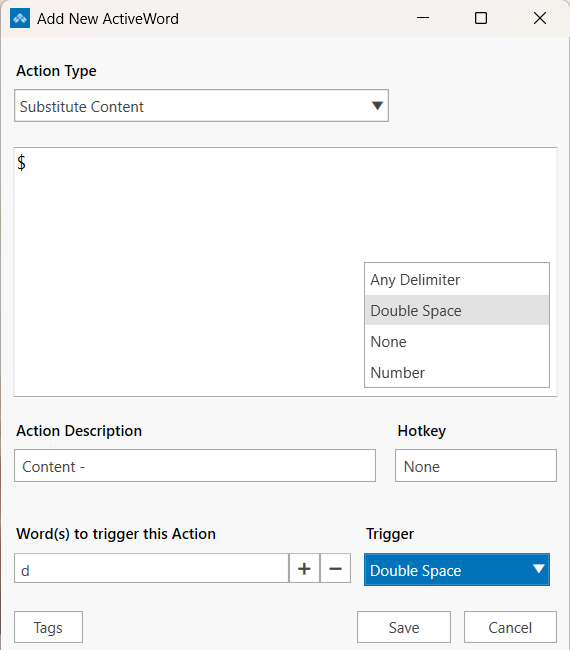
Custom Triggers can also use some regular expression patterns. ActiveWords follows ICU regular expression syntax. For the full specification, see the ICU regular expression guide and the Unicode category reference.
Include Or Exclude The Trigger
When you define a custom trigger, you can choose whether to include the typed trigger in the result of a Substitute Text Action. New custom triggers start with Include checked.
- Check Include if the trigger should remain in the inserted text.
- Leave Include unchecked if the trigger is only a signal to run the Word.
- All other Action types exclude the trigger.
Examples
- Simple abbreviation: Use Any Delimiter for a Word such as addr that inserts an address when followed by a space or punctuation.
- Sentence-ending substitution: Use a period custom trigger when the punctuation itself should finish the Word.
- Numeric or currency-style entries: Use a number-based custom trigger when the typed value determines what should happen next. For example, a Word
dthat substitutes a dollar sign and includes the trigger turnsd6into$6as you type. The free currency Addin uses this pattern with five ready-made currency Words. - Different outputs from the same Word: You can associate the same Word with more than one Action when different triggers should produce different results.
Default Trigger For New Words
ActiveWords can use a default Trigger when you create new Words. Set the default in the Default Trigger menu on the Triggers tab in Options. New Word/Action associations start with that Trigger selected.
Changing Or Deleting Custom Triggers
To delete a custom Trigger, select it on the Triggers tab and click Remove Trigger. Any Words that used that Trigger are set to None. You do not need to find and change those Words first.
ActiveWords works across Windows, including at the Windows Desktop and in places where there is no active text cursor. Windows or some programs may play the default system sound when you type where no cursor input is expected.
Turn Off the Default Beep
- Search Windows Settings for Change System Sounds.
- Scroll to Default Beep in the Program Events section.
- Select the Sounds menu.
- Scroll to the top and select (None).
- Click OK.
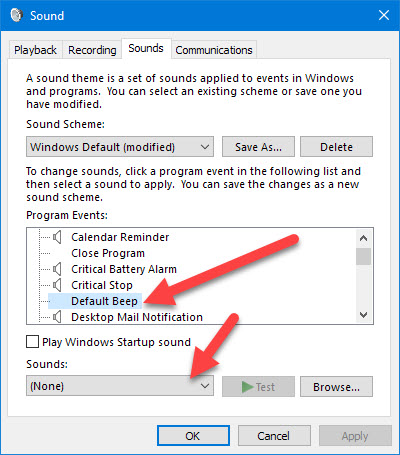
ActiveWords 5 introduces important changes to how data is stored and managed. These changes are foundational and affect how ActiveWords behaves across versions.
This article explains what has changed, why it changed, and what it means when you upgrade to ActiveWords 5.
What Changed in ActiveWords 5
In previous versions, ActiveWords used a version-specific folder structure and database format.
ActiveWords 5 moves away from that approach by:
- Using a single ActiveWords folder
- Introducing a new internal database structure
- Separating ActiveWords 5 data from earlier versions
These changes are part of a broader effort to modernize the platform.
Why the Folder Structure Was Updated
The updated folder structure simplifies how ActiveWords manages data internally and prepares the product for future versions.
Key benefits include:
- Cleaner organization with fewer version-specific folders
- Easier long-term maintenance
- A more flexible foundation for new features
While most users will not interact directly with these folders, the change affects how data is handled behind the scenes.
Database Changes and Compatibility
ActiveWords 5 uses a new database format that is not compatible with ActiveWords 4.
This means:
- Actions created or edited in ActiveWords 5 cannot be used in ActiveWords 4
- Switching back to ActiveWords 4 does not carry over V5-specific changes
This one-way behavior is intentional and supports ongoing development.
Important: ActiveWords 5 uses a new database structure. Actions that are created or edited in ActiveWords 5 cannot be used in ActiveWords 4, and if you return to ActiveWords 4, any changes made in ActiveWords 5 will not appear. This behavior is expected and supports future development.
What This Means When You Upgrade
Because of these changes, treat ActiveWords 5 as its own working version, not as a temporary copy of ActiveWords 4.
If you plan to switch back to ActiveWords 4:
- Avoid making large structural changes in V5 that you expect to reuse in V4
- Use ActiveWords 5 for new V5 workflows and features
- Expect your V4 setup to remain unchanged when you return
This approach helps avoid confusion when working across versions.
Can You Move Data Between Versions?
There is currently no supported way to migrate Actions created in ActiveWords 5 back to ActiveWords 4.
This limitation is by design because ActiveWords 5 uses a newer database format.
Who Should Pay Special Attention to This
These changes are especially important for:
- Power users with extensive Action libraries
- Users moving between ActiveWords 4 and ActiveWords 5
- Anyone managing shared or carefully organized Action sets
Understanding these differences helps avoid confusion and unexpected behavior.
What to Read Next
To learn more about how these changes affect installation and daily use, see:
Input commands can be included in any Action. These enable the user to enter search terms or variables as the Action is being executed. The most common uses of the Input command are in Text and Content Substitutions, in Actions that Open Web Pages, and in Script Actions. You can use multiple Input commands in a single Action. You can trigger text substitution Actions within the Input field
See video: Watch the video
Using Input Commands in Text and Content Substitution
Usage: Place Input commands within text where user input is needed.
Syntax: ${input "[ask for input]","[input dialog title]"}
Example: ${input "Enter Customer's Last Name:","Enter Last Name"}
Dialog:
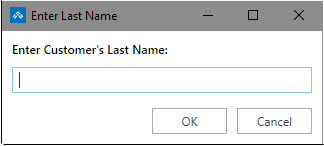
Using Input Commands With Web Pages
Usage: Replace searched text within a result URL with the Input command.
Syntax: ${input "[ask for input]","[input dialog title]"}
Example: http://www.bing.com/search?q=${input "Search the Internet:", "Bing Internet Search"}
After a year of extensive testing and development alongside the ActiveWords community, we're proud to introduce ActiveWords 5. It is a free upgrade for every existing user and the biggest step forward for ActiveWords in years.
ActiveWords 5 keeps the familiar idea at the heart of ActiveWords: type a Word, trigger an Action, and keep moving. Version 5 extends that idea with a more capable ActionPad, better ways to work with selected text, improved hotkeys, new calculation tools, and a stronger foundation for building and organizing Actions.
A More Capable ActionPad
The expanded ActionPad is one of the biggest changes in ActiveWords 5. It is now a central, keyboard-driven place to search, calculate, discover, and act.
- Trigger your Words and Actions
- Find applications, files, folders, and Start Menu items
- Perform advanced calculations and date calculations
- Work with Selected Text actions
Learn more in the ActionPad FAQ.
Selected Text Becomes Central
Selected Text, previously called ActionText, is now easier to understand and more central to the ActiveWords workflow. Highlight text almost anywhere on your computer, then use ActiveWords to search, look something up, send the text into a custom Action, or display it in Large Type.
Selected Text actions can also appear in the ActionPad, bringing search, selection, and action together in one place.
Improved Hotkey Management
Hotkeys in ActiveWords 5 are more flexible and less confusing.
- The ActionPad hotkey is configured in one place
- Individual Actions can have their own hotkeys
- Multiple Actions can share a hotkey and present a Pick List
New Tools for Everyday Work
ActiveWords 5 adds several practical capabilities that help in the middle of real work:
- Advanced Calculator for more complex numeric expressions
- Date Calculations in the ActionPad and in Actions
- Large Type for displaying selected text clearly
- Optional audio feedback when text expansion completes
Easier Organization and More Powerful Actions
Tags now have a new interface in the main window, making larger collections of Actions easier to manage.
The Wizard helps you build more advanced Actions with less guesswork. It can insert syntax for scripting and prompted input, giving both new and experienced users a clearer path into deeper automation.
Important Structural Changes
ActiveWords 5 also includes changes to how data is stored and managed:
- The folder structure has been simplified
- The internal database format has changed
- Actions created or modified in ActiveWords 5 are not compatible with ActiveWords 4
These changes support future development, but they are important to understand before switching versions.
What to Read Next
Windows Search lets the ActionPad search your computer for files, folders, applications, and Start Menu items. When enabled, typing in the ActionPad finds not only your Words but also items across your system.
Enabling Windows Search
Open Options and go to the ActionPad tab. Turn on Windows Search to include files, folders, applications, and Start Menu items in ActionPad search results. When Windows Search is off, the ActionPad searches only ActiveWords (and other enabled options such as Date Calculations and Advanced Calculator).
Windows Search in ActiveWords depends on the Windows Search (Indexing) service in Windows. If search does not find files, folders, or applications, the service may be stopped. To turn it on:
- Press Win+R to open the Run dialog, type
services.msc, and press Enter. - In the list of services, find Windows Search.
- Right-click Windows Search and choose Start if the service is stopped.
- To have the service start automatically with Windows, right-click Windows Search, choose Properties, set Startup type to Automatic, then click OK.
What Windows Search Finds
- Folders – Files and folders on your computer
- Applications – Installed programs, including both traditional desktop applications and packaged apps from the Microsoft Store
- Start Menu items – Programs and shortcuts in the Windows Start Menu
Packaged Apps vs. Traditional Applications
A packaged application is an app you download and install from the Microsoft Store (or one that came preinstalled with Windows from the Store). A traditional application is typically installed from the web or from an installer. Both types appear in ActionPad search results when Windows Search is enabled. For example, Notepad on Windows 11 is a packaged app; many other programs you install manually are traditional applications.
How Search Matches
You can control how search matches your typing:
- Starts with – Results must begin with the text you type (e.g., typing "calc" finds Calculator but not "Windows Calculator")
- Contains – Results can match anywhere in the name (e.g., typing "calc" finds Calculator, Windows Calculator, etc.)
Where to Search
You can limit where Windows Search looks:
- System – Search your entire computer
- Profile – Limit the search to files and folders under your user profile
Choosing Profile can speed up search if you only need results from your personal files and folders.
Related FAQs
- ActionPad – Overview and configuration
- Date Calculations – Date arithmetic in the ActionPad
- Advanced Calculator – Math in the ActionPad
- ActionPad Options – Font, color, and display options
The Wizard is a right-click menu in the action editor that inserts common syntax for you, so you don't have to remember the commands. It appears when you create or edit Substitute Text, Substitute Content, Open URL, Script, and other action types. What you see in the Wizard depends on the action type you're creating or editing. The Wizard is new in ActiveWords 5 and makes scripting features easier and more accessible.
Why the Wizard Exists
Many users avoided scripting because they had to remember the syntax. The Wizard makes these features easier to use: you choose from the menu and the correct syntax is inserted. Script is the primary focus: you can build automated sequences (for example, open an app, wait for it, send keys to navigate, then combine with an input prompt for text). For advanced scripting, the Wizard complements the full Scripts and Syntax documentation.
Where to Find the Wizard
When editing an action, right-click in the content or description field. The Wizard appears in the context menu. Choose an option and the corresponding syntax is inserted at the cursor position.
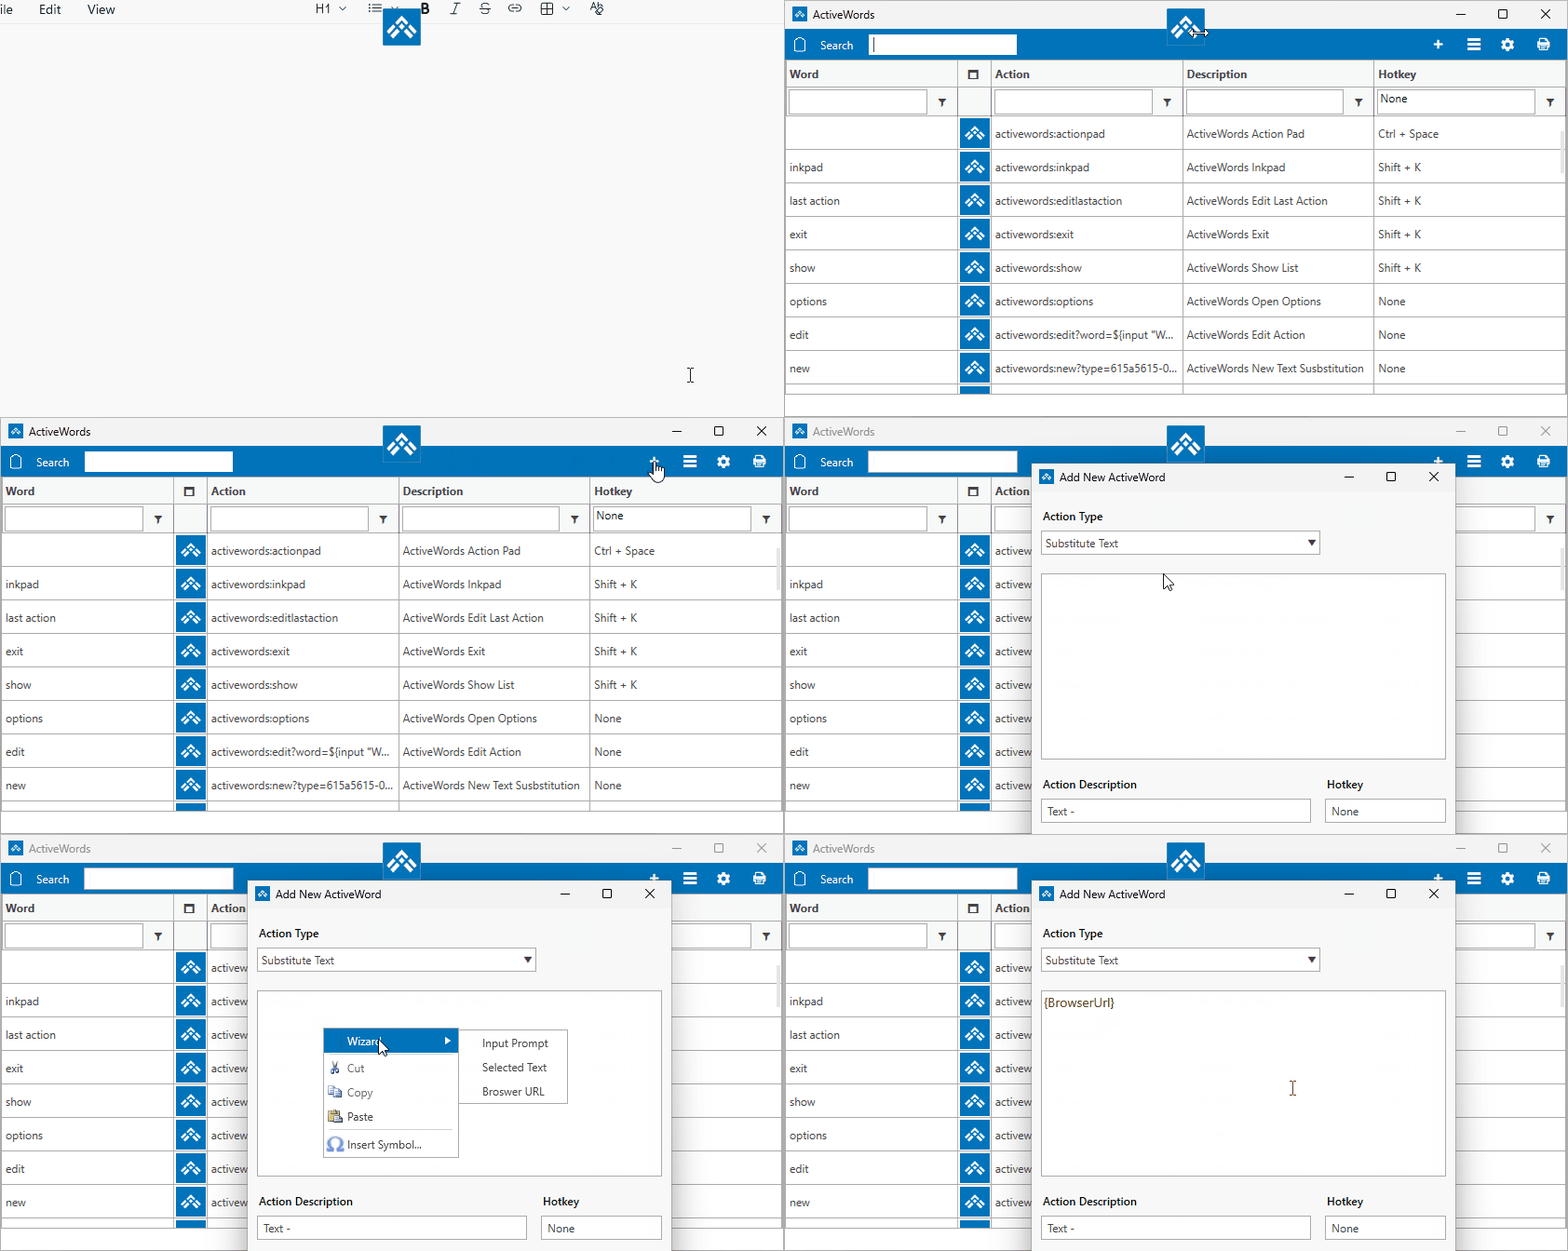
Wizard Options for Substitute Text and Other Actions
For Substitute Text, Substitute Content, Open URL, and similar action types, the Wizard offers three options. Script actions have a different, larger set of Wizard options (see below).
- Input prompts – Inserts the syntax for a user input dialog. Use this when you need the person to type something that gets inserted into the action—for example, a letter heading that starts with "Dear [person's name]" and then the rest of the letter. You can use one or more input prompts in a single action.
- Selected text – Inserts the syntax for using the user's selected (highlighted) text. Use this when the action should include whatever text the user has selected—for example, appending selected text to the end of a URL for a search query. Works with Selected Text actions. You can also combine selected text with input prompts.
- Current browser URL – New in ActiveWords 5. Inserts the syntax for the URL of the page your browser is currently on. Use this when the action should include the current page address.
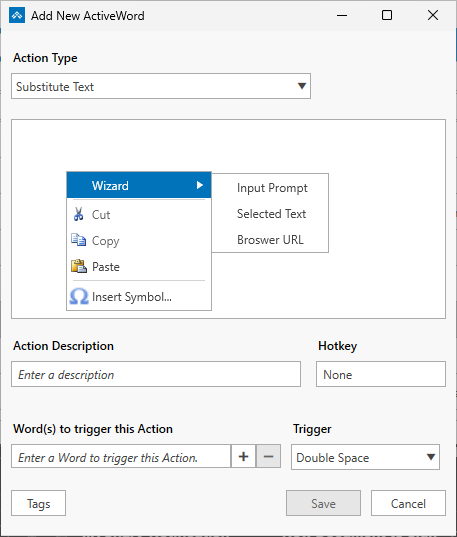
Wizard Options for Script Actions
Script is the main reason the Wizard exists; scripting is where you can do the most. For Script actions, the Wizard offers many options so you don't have to remember the syntax: open a program (for example, a text editor), show a message, trigger another Word, copy or empty the clipboard, send key presses (including modified keys and media keys), insert long date (expanded when you trigger the action), and various other functions. One more category is still being added (managing windows, launching apps and waiting for them to be visible). The Script Wizard is still being expanded; options for Substitute Text and other action types are complete. For the full list of script commands and syntax, see Scripts and Syntax.
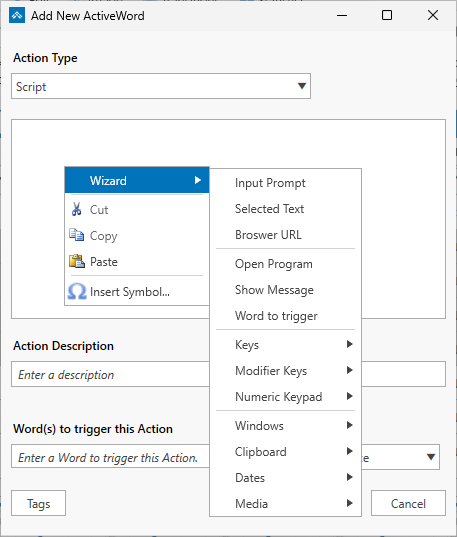
Example: Script with Input Box
One common use of the Script Wizard is to insert an input box into a script so the action can personalize text. For example, you might create a script that starts with Dear ${input(\"Name\")}, and then the rest of your letter. Using the Wizard in a Script action, you insert an Input box token, save the action as a Word, then trigger that Word from within Notepad. When you trigger it, ActiveWords shows the input dialog, you type the name, and the script inserts the finished text into Notepad.
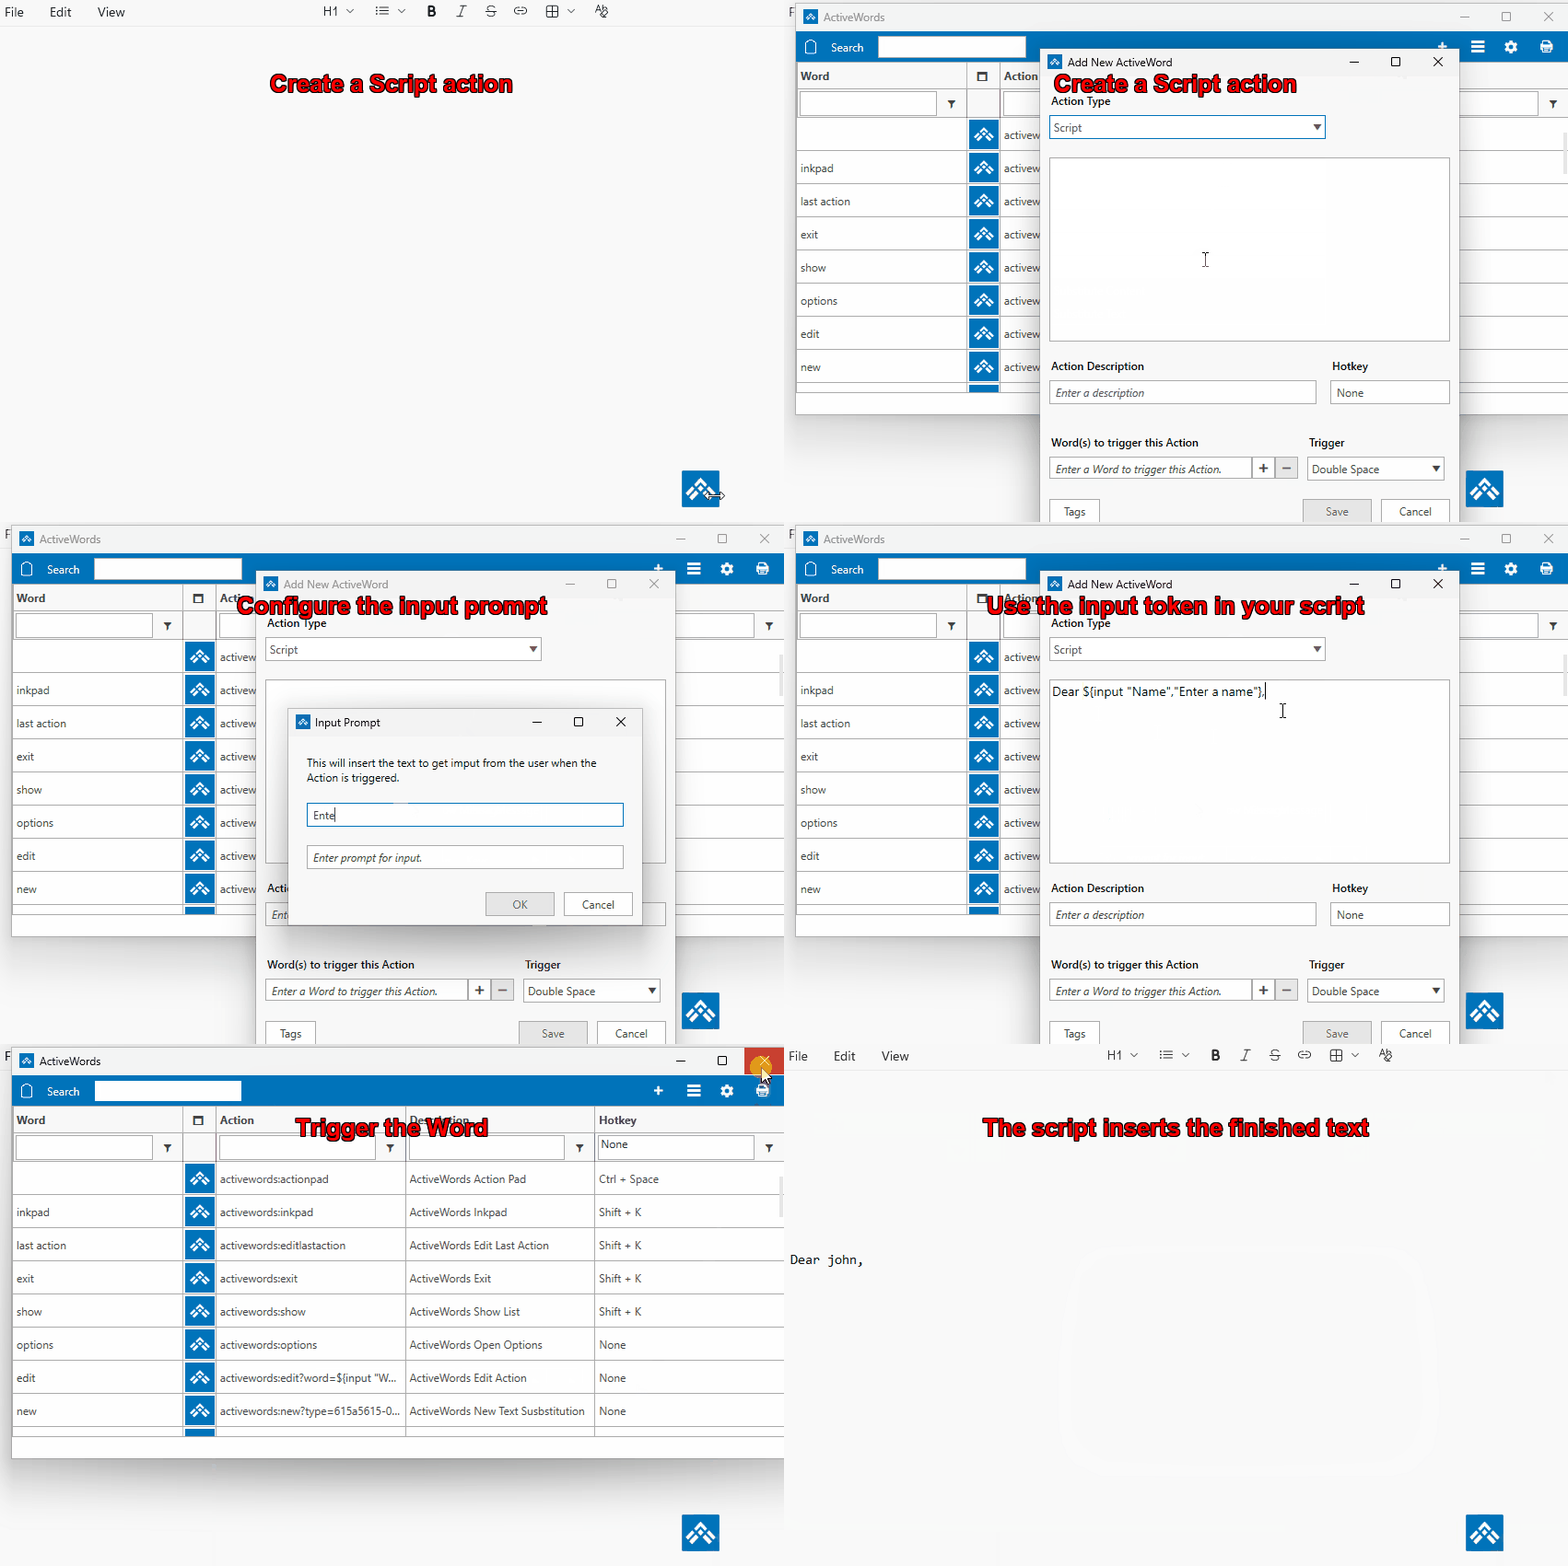
Related FAQs
- Selected Text – Use highlighted or pasted text in actions
- Scripts and Syntax – Full scripting reference and command list
- Script Examples – Copy-paste script examples and downloads
- List View – Create and edit actions
Triggered Words may not be removed in some older software, Win32 applications, or Universal Apps that do not fully comply with Microsoft UI Automation API requirements.
What To Do
If you use an application where triggered Words are not removed, contact support and include the application name, Windows version, and a brief example of the behavior. In some cases, an application-specific exception may be possible.
ActiveWords is designed to help protect your data while it monitors for the Words and triggers you define. ActiveWords does not log or transmit your keystrokes during normal use, and your ActiveWords database is strongly encrypted.
How ActiveWords Protects Your Data
- Keystrokes are monitored locally – ActiveWords watches for your defined Words and triggers, but it does not log or transmit keystrokes.
- Your database is encrypted – The ActiveWords database is strongly encrypted.
- Password fields are protected – ActiveWords detects when keyboard input is in a password field and disables text monitoring by default.
- Network traffic is limited – ActiveWords only uses internet traffic to validate your license or check for a new version of the software. This traffic is sent over secure HTTPS.
When the Internal Buffer Is Cleared
ActiveWords uses an internal memory buffer to recognize when you are triggering an Action. This buffer is securely cleared every time you:
- Press Enter or another key that changes the text insertion point, such as an arrow key or Esc.
- Trigger an Action.
- Right-click the mouse.
Logging and Clipboard Use
For support purposes, you may choose to turn on verbose logging. Verbose logging can record keystrokes in a plain-text log file, but that log is stored only on your device and is provided to us only if you voluntarily share it for product support.
ActiveWords sometimes uses the Windows Clipboard to deliver content. If you have Windows Clipboard History turned on, Actions that use the clipboard will not update Windows Clipboard History.
Note: Verbose logging should be used only when needed for support and turned off when troubleshooting is complete.